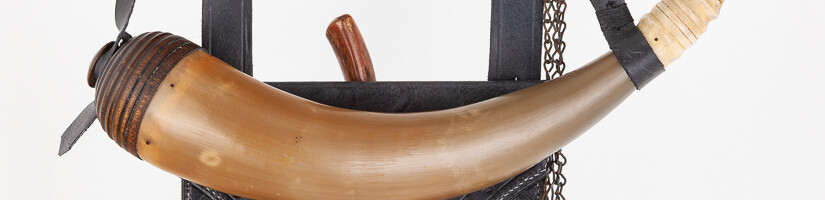
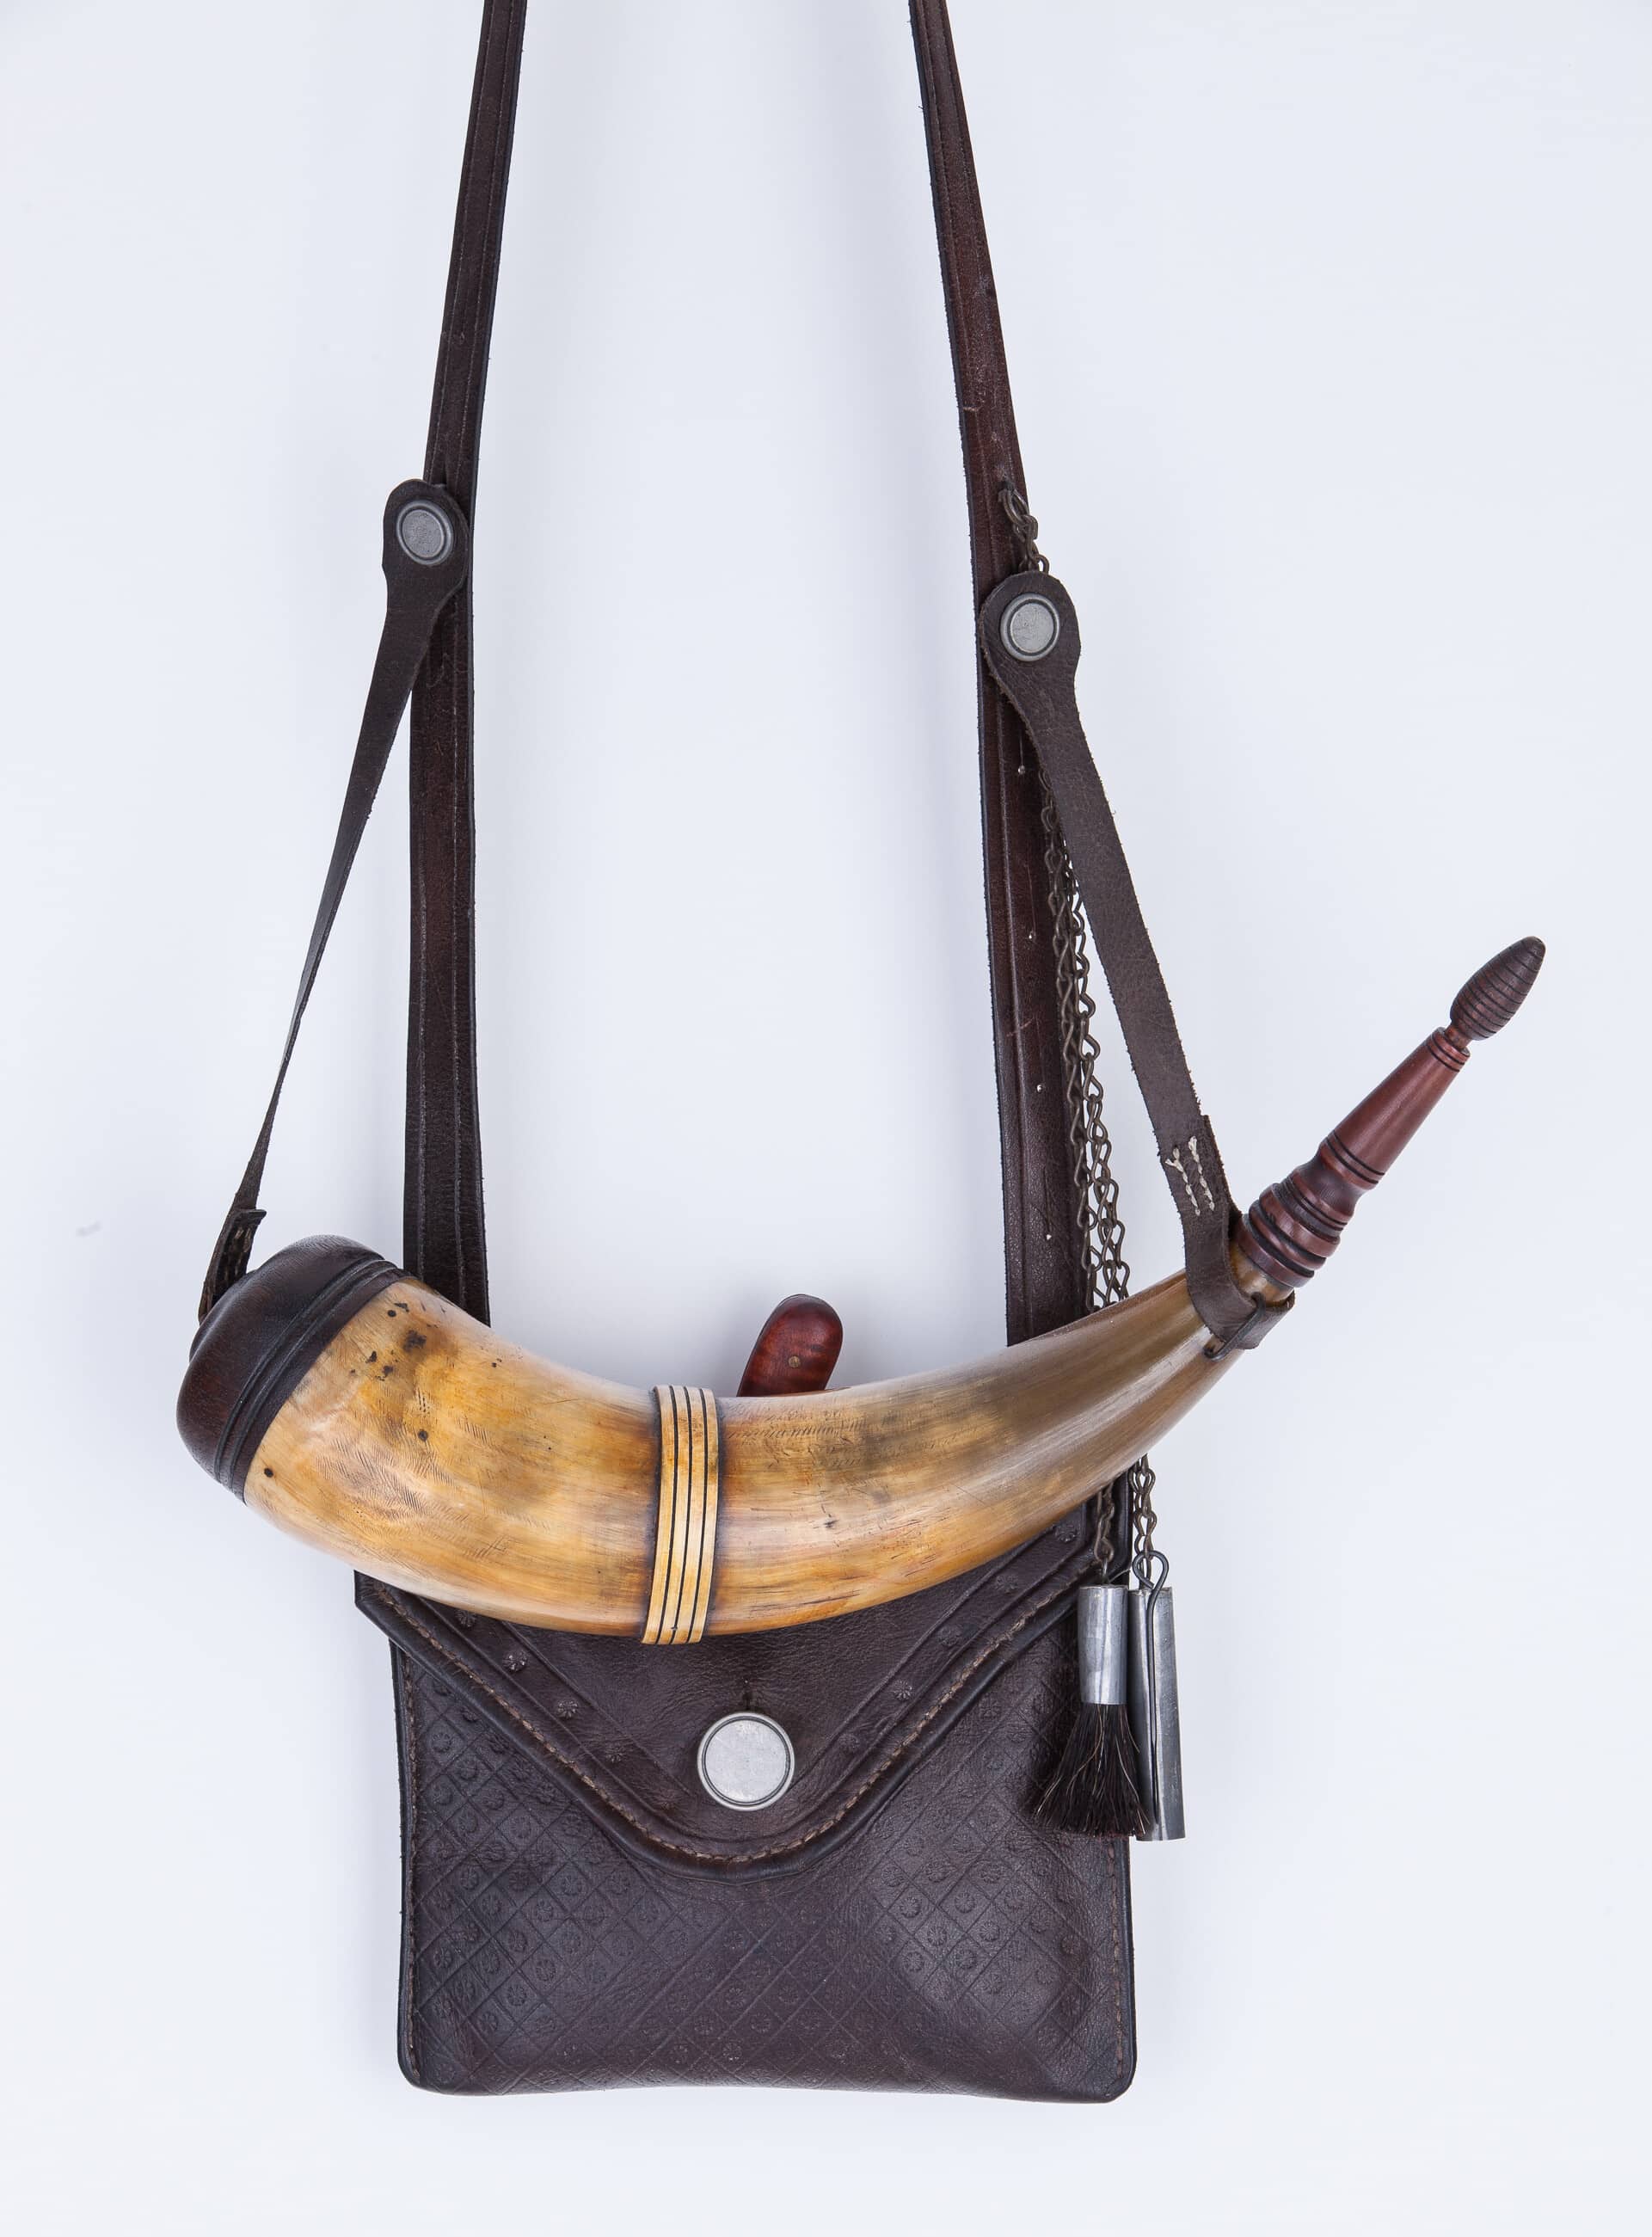
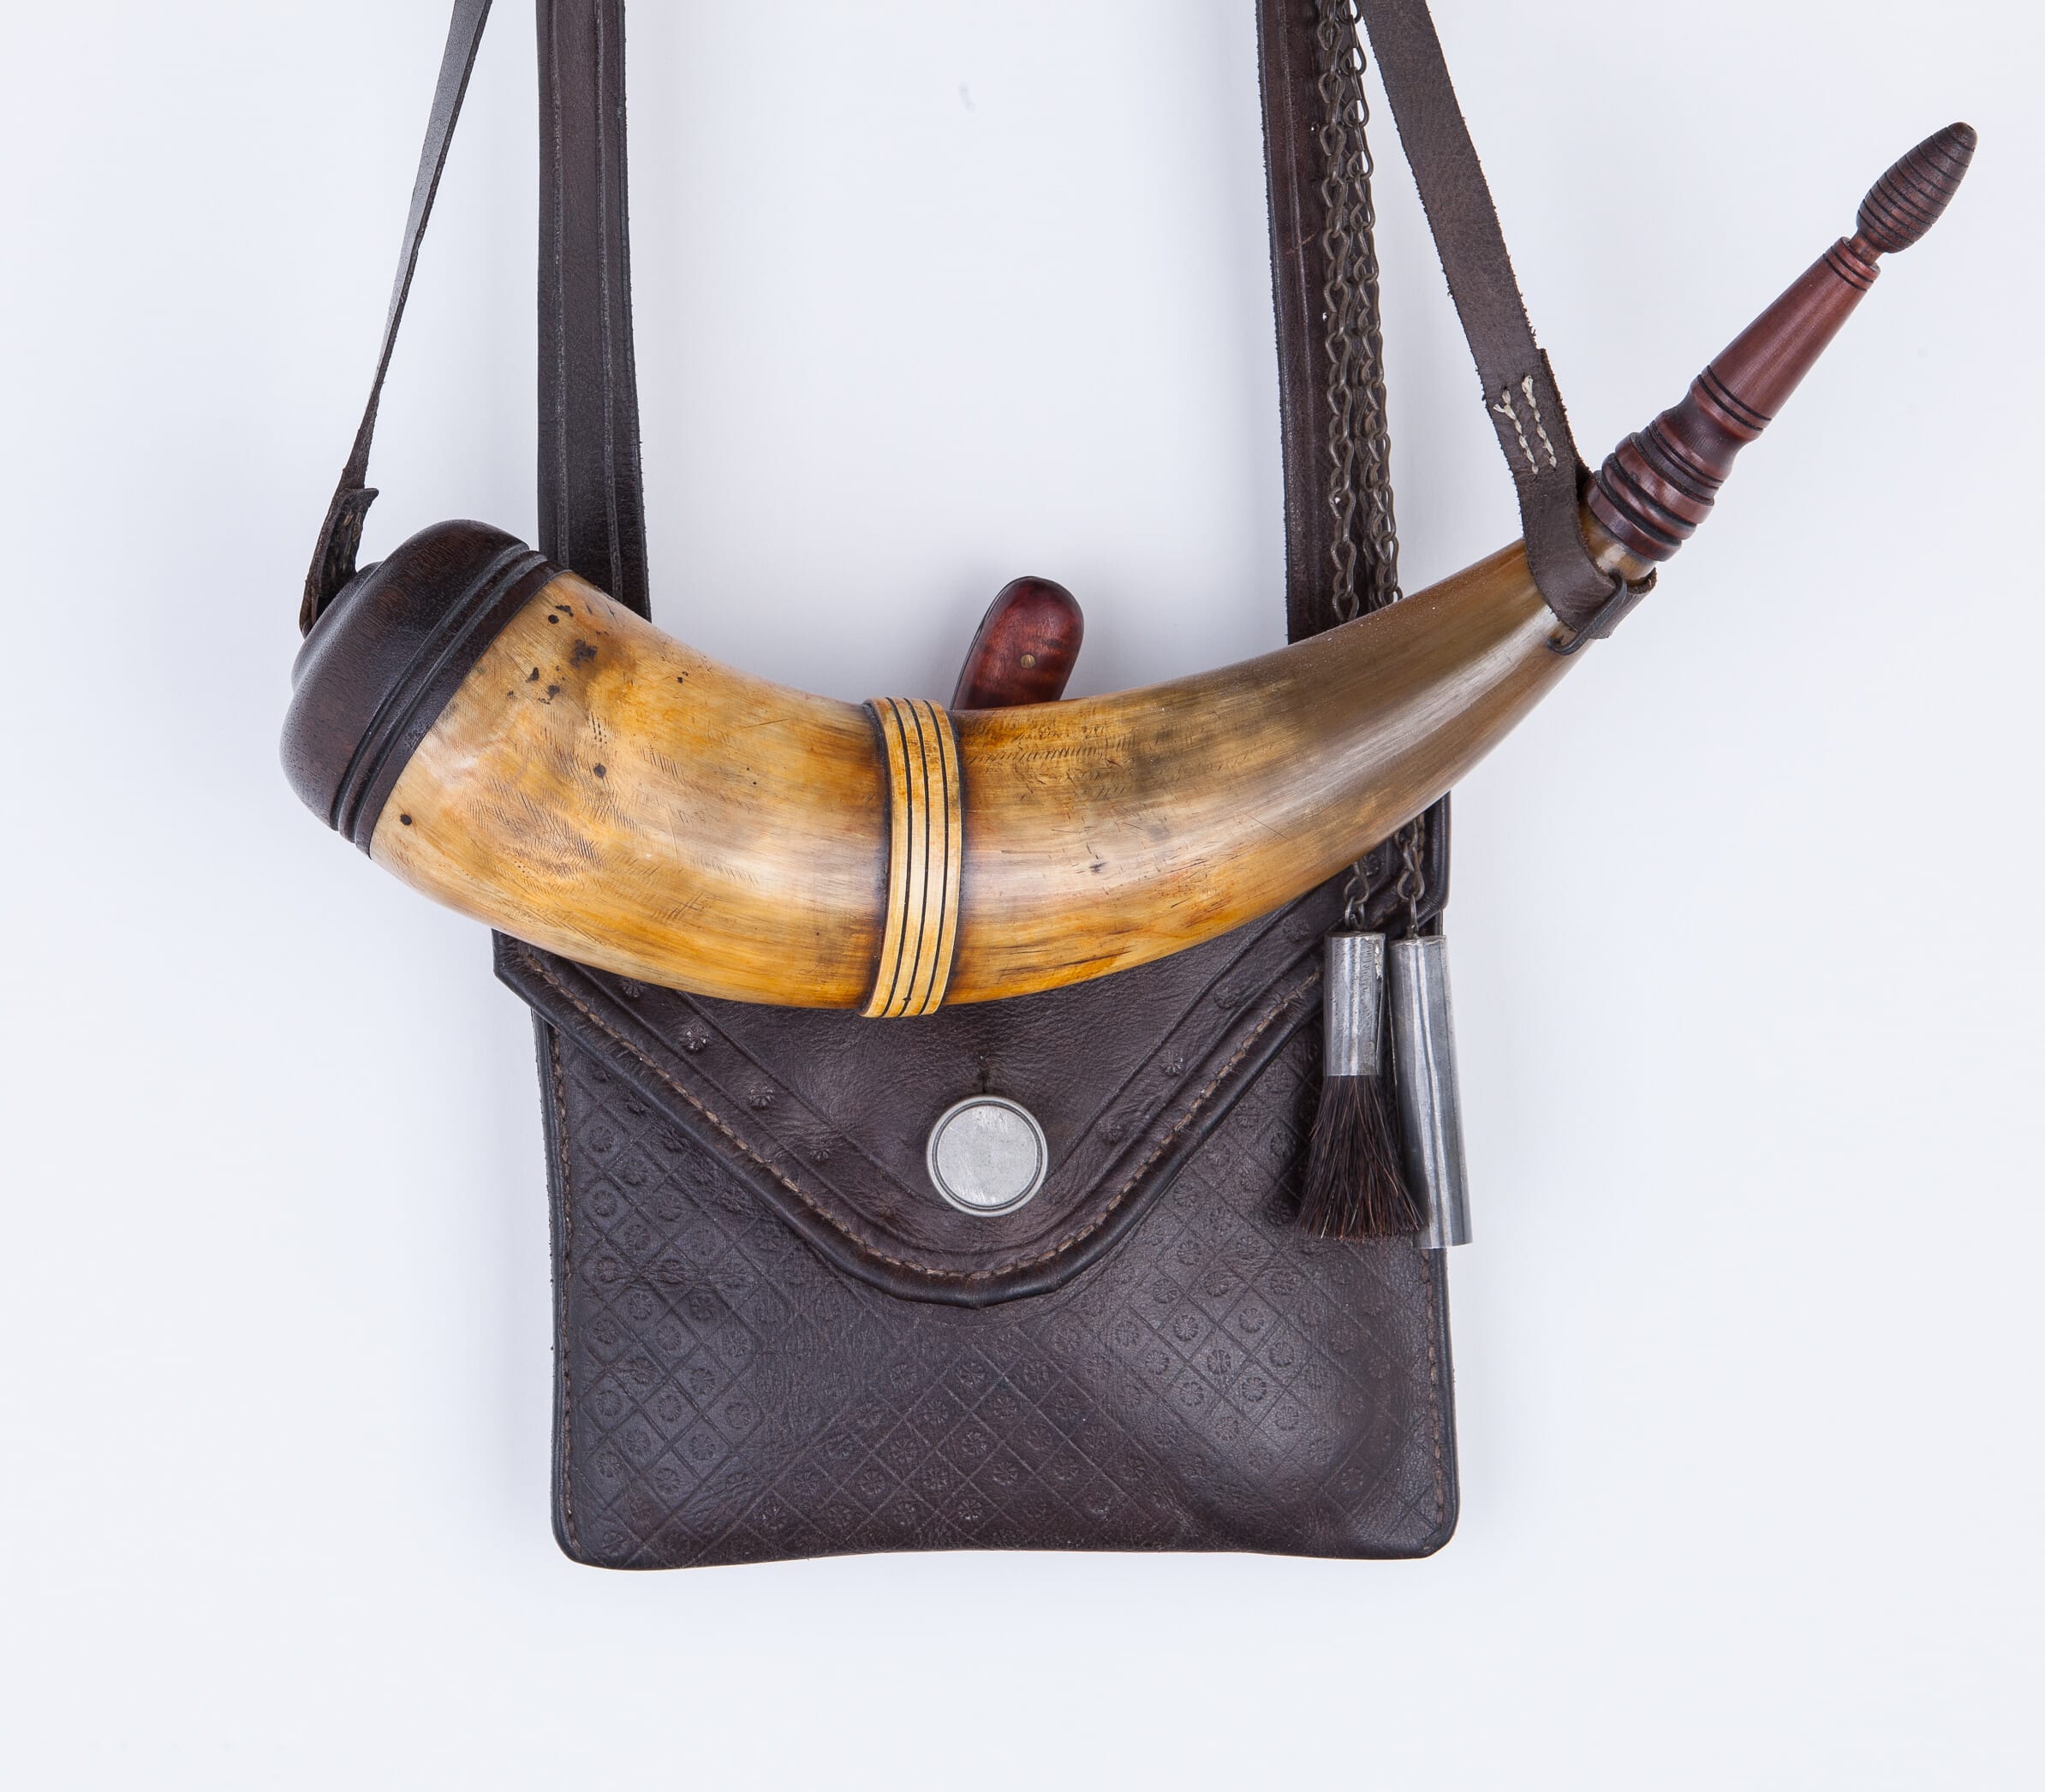
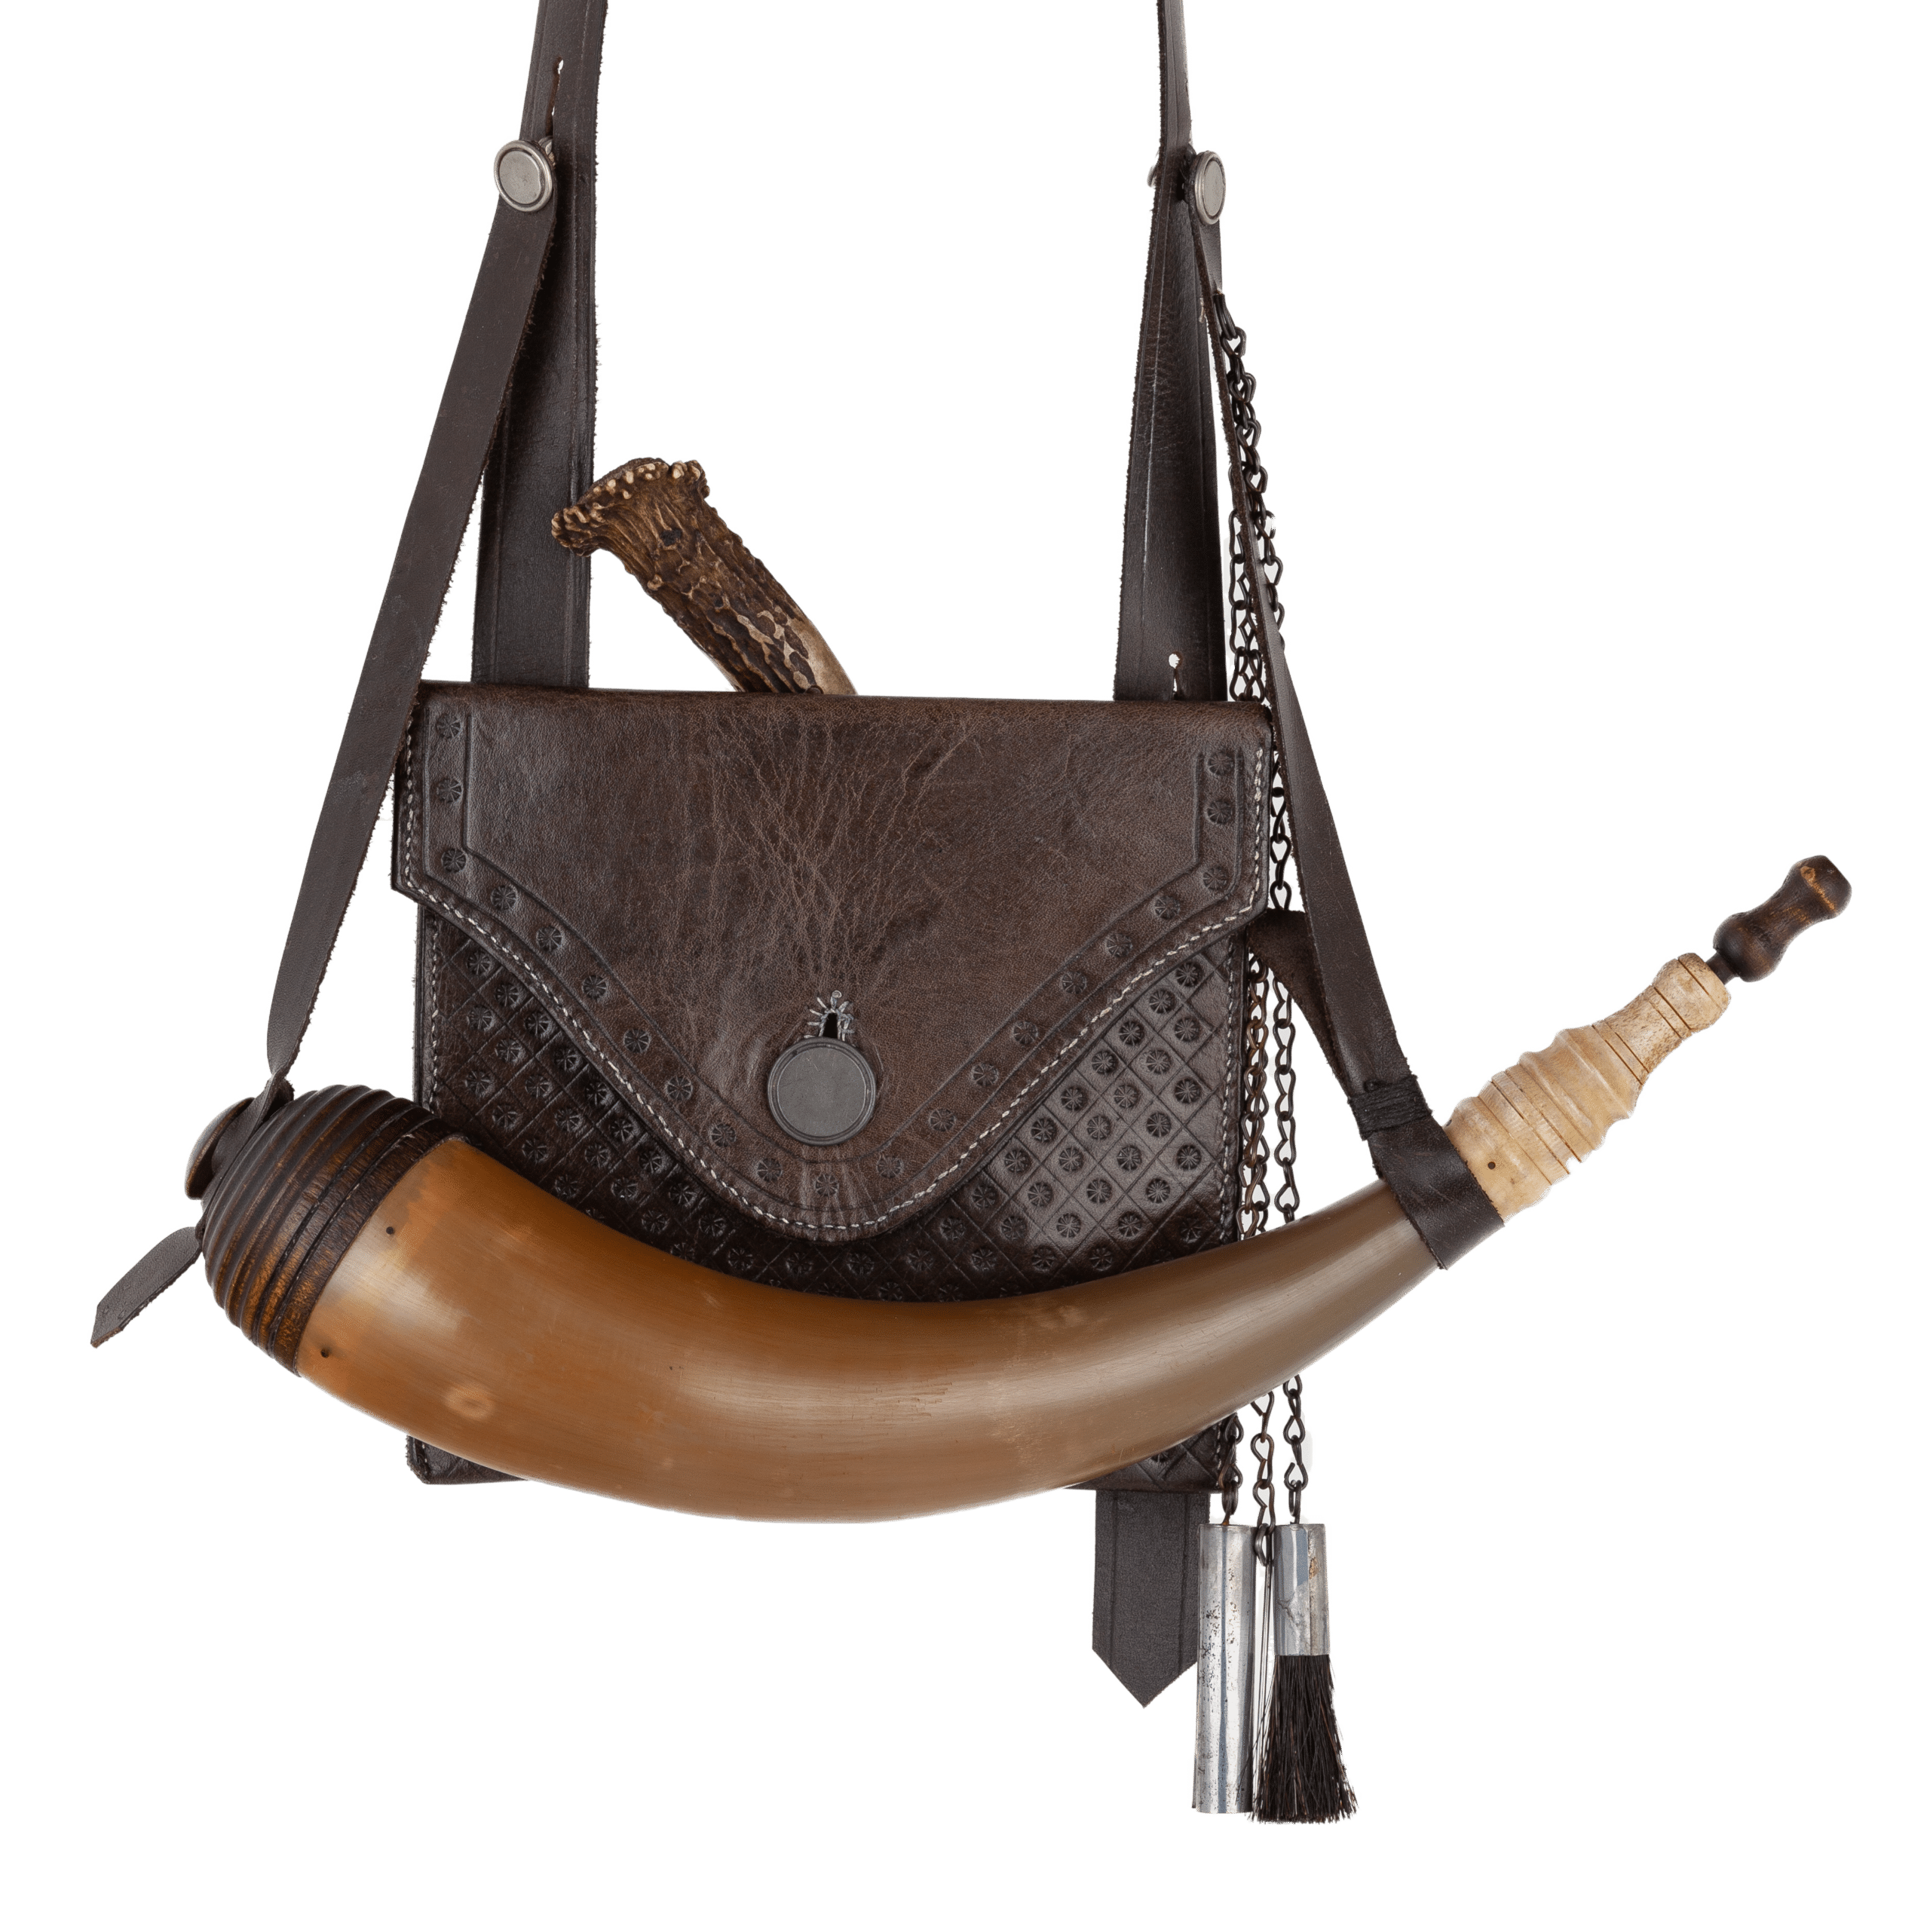
 Shown here is an outfit that I made for myself consisting of an early Virginia shot pouch and a Virginia banded, screw-tip powder horn. Most of the shot pouches made these days are relatively complicated affairs using designs from the early to middle 19th century. If you want a shot pouch that is proper for the 18th century, take a close look at this shot pouch and powder horn. I put together an outfit that I felt would be proper for 1775 on the Virginia frontier.
There are very few examples of shot pouches from the 18th century. So, I was fortunate to be able to study an original early Virginia shot pouch that matches the size and construction of another published (Clash of Empires exhibition catalog, p. 30) pouch known to date to the period of the French and Indian War. This original Virginia shot pouch was documented by Wallace Gusler in the December 2009 Muzzle Blasts(pp. 4-8).
 The original one piece pouch is square at the bottom (although the corners look rounded due to use) and stitched up the sides with a very fine stitch very close to the edge. A divider that is open at the bottom serves as a welt between the front and the back of the bag. A pewter flap button is anchored to a stag horn button on the inside of the pouch. The stag horn button was covered by a round piece of leather that served to prevent the user’s hand from catching on the button. The flap extends approximately halfway down the front of the bag and has a slight beaver tail shape with a welted edge.
The original bag did not have a strap attached and was missing part of the leather at one attachment point. However, there was evidence of a strap stitched to one side and a button hole on the other side. Actually, it was just a rough cut hole through which two buttons might have been tied to each other. Wallace Gusler indicated in his article that he believed two linked buttons (as in a cufflink) connected the strap to the bag using the button hole. The hole on the original pouch went through the welt and front of the bag as the back was torn away at that spot. I believe, the button was originally placed on the inside of the back and eventually pulled through tearing the back. That is why I did not run the button hole all the way through all three layers of leather on my recreation of the pouch.
I have made a number of hunting pouches based on this original. I have generally maintained the size and shape but varied the construction (i.e. external vs. internal stitching), the type of strap (i.e. leather vs. woven) and the type of attachment (i.e. location and number of buttons) for the strap. The original pouch actually appears to have rounded corners due to wear, and I made several copies that way before I realized that it was an optical illusion. Even in this very close copy, I still rounded the corners slightly in order to give the bag a finished look.
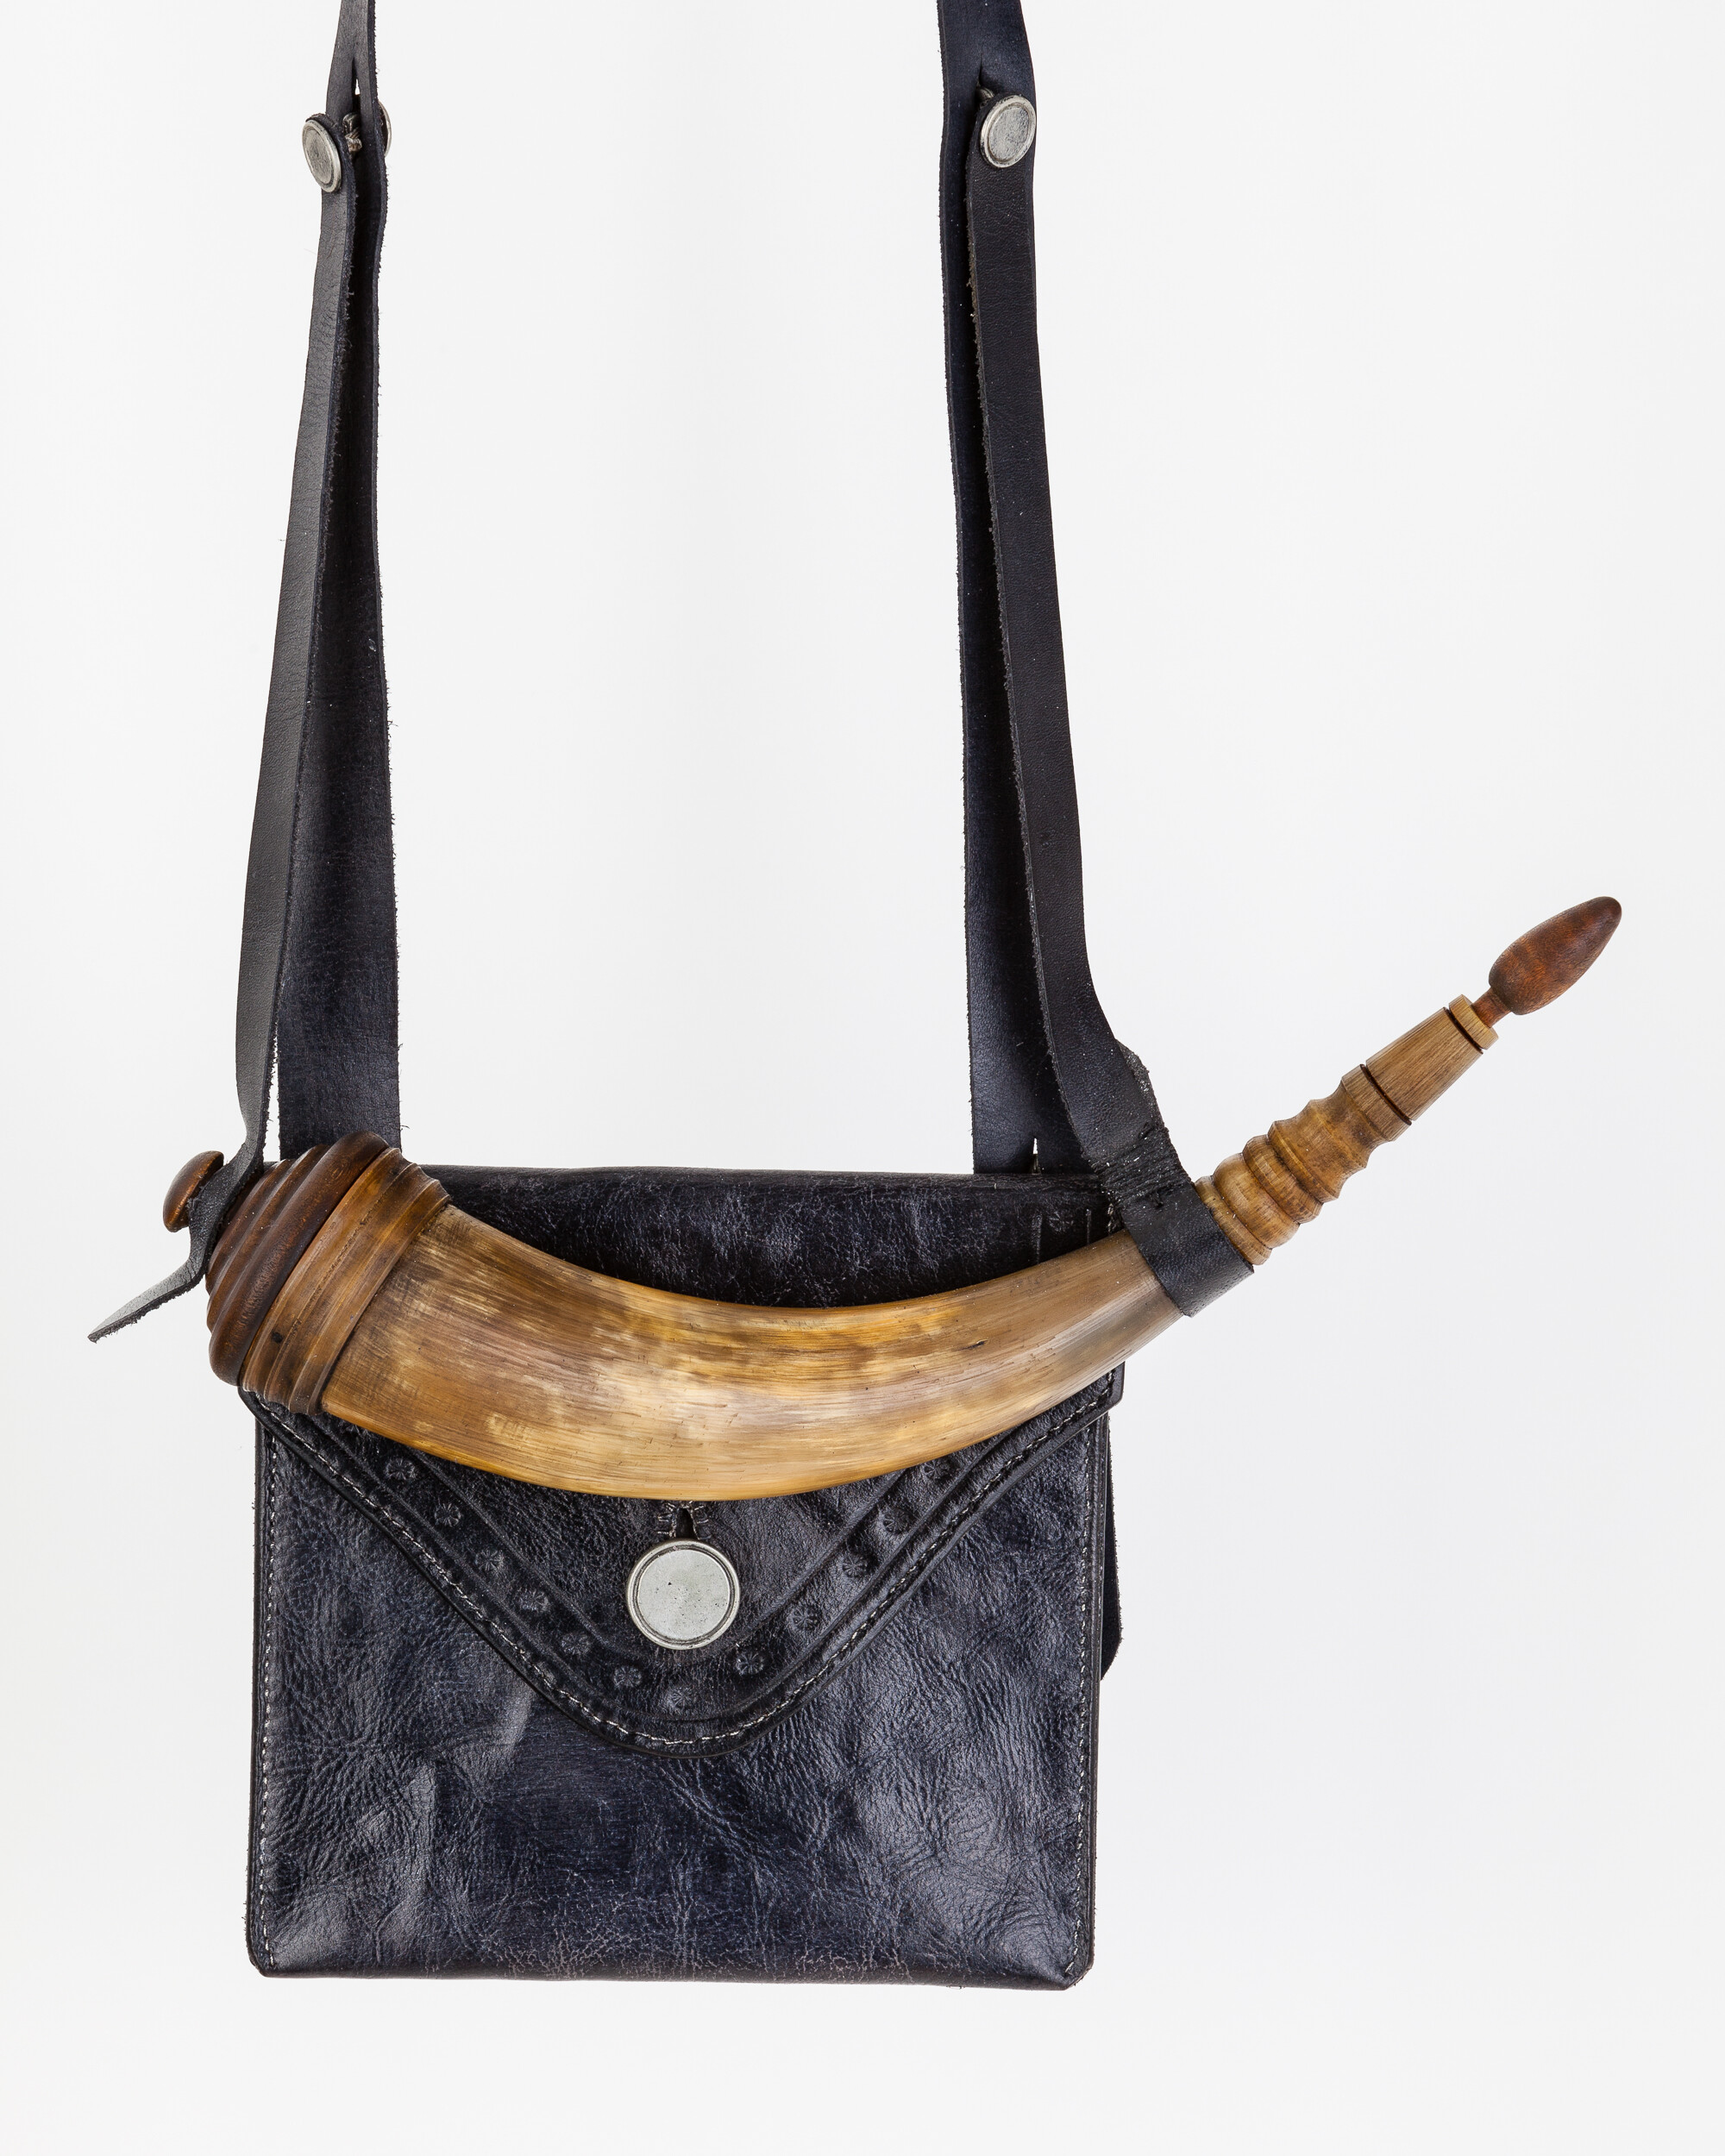
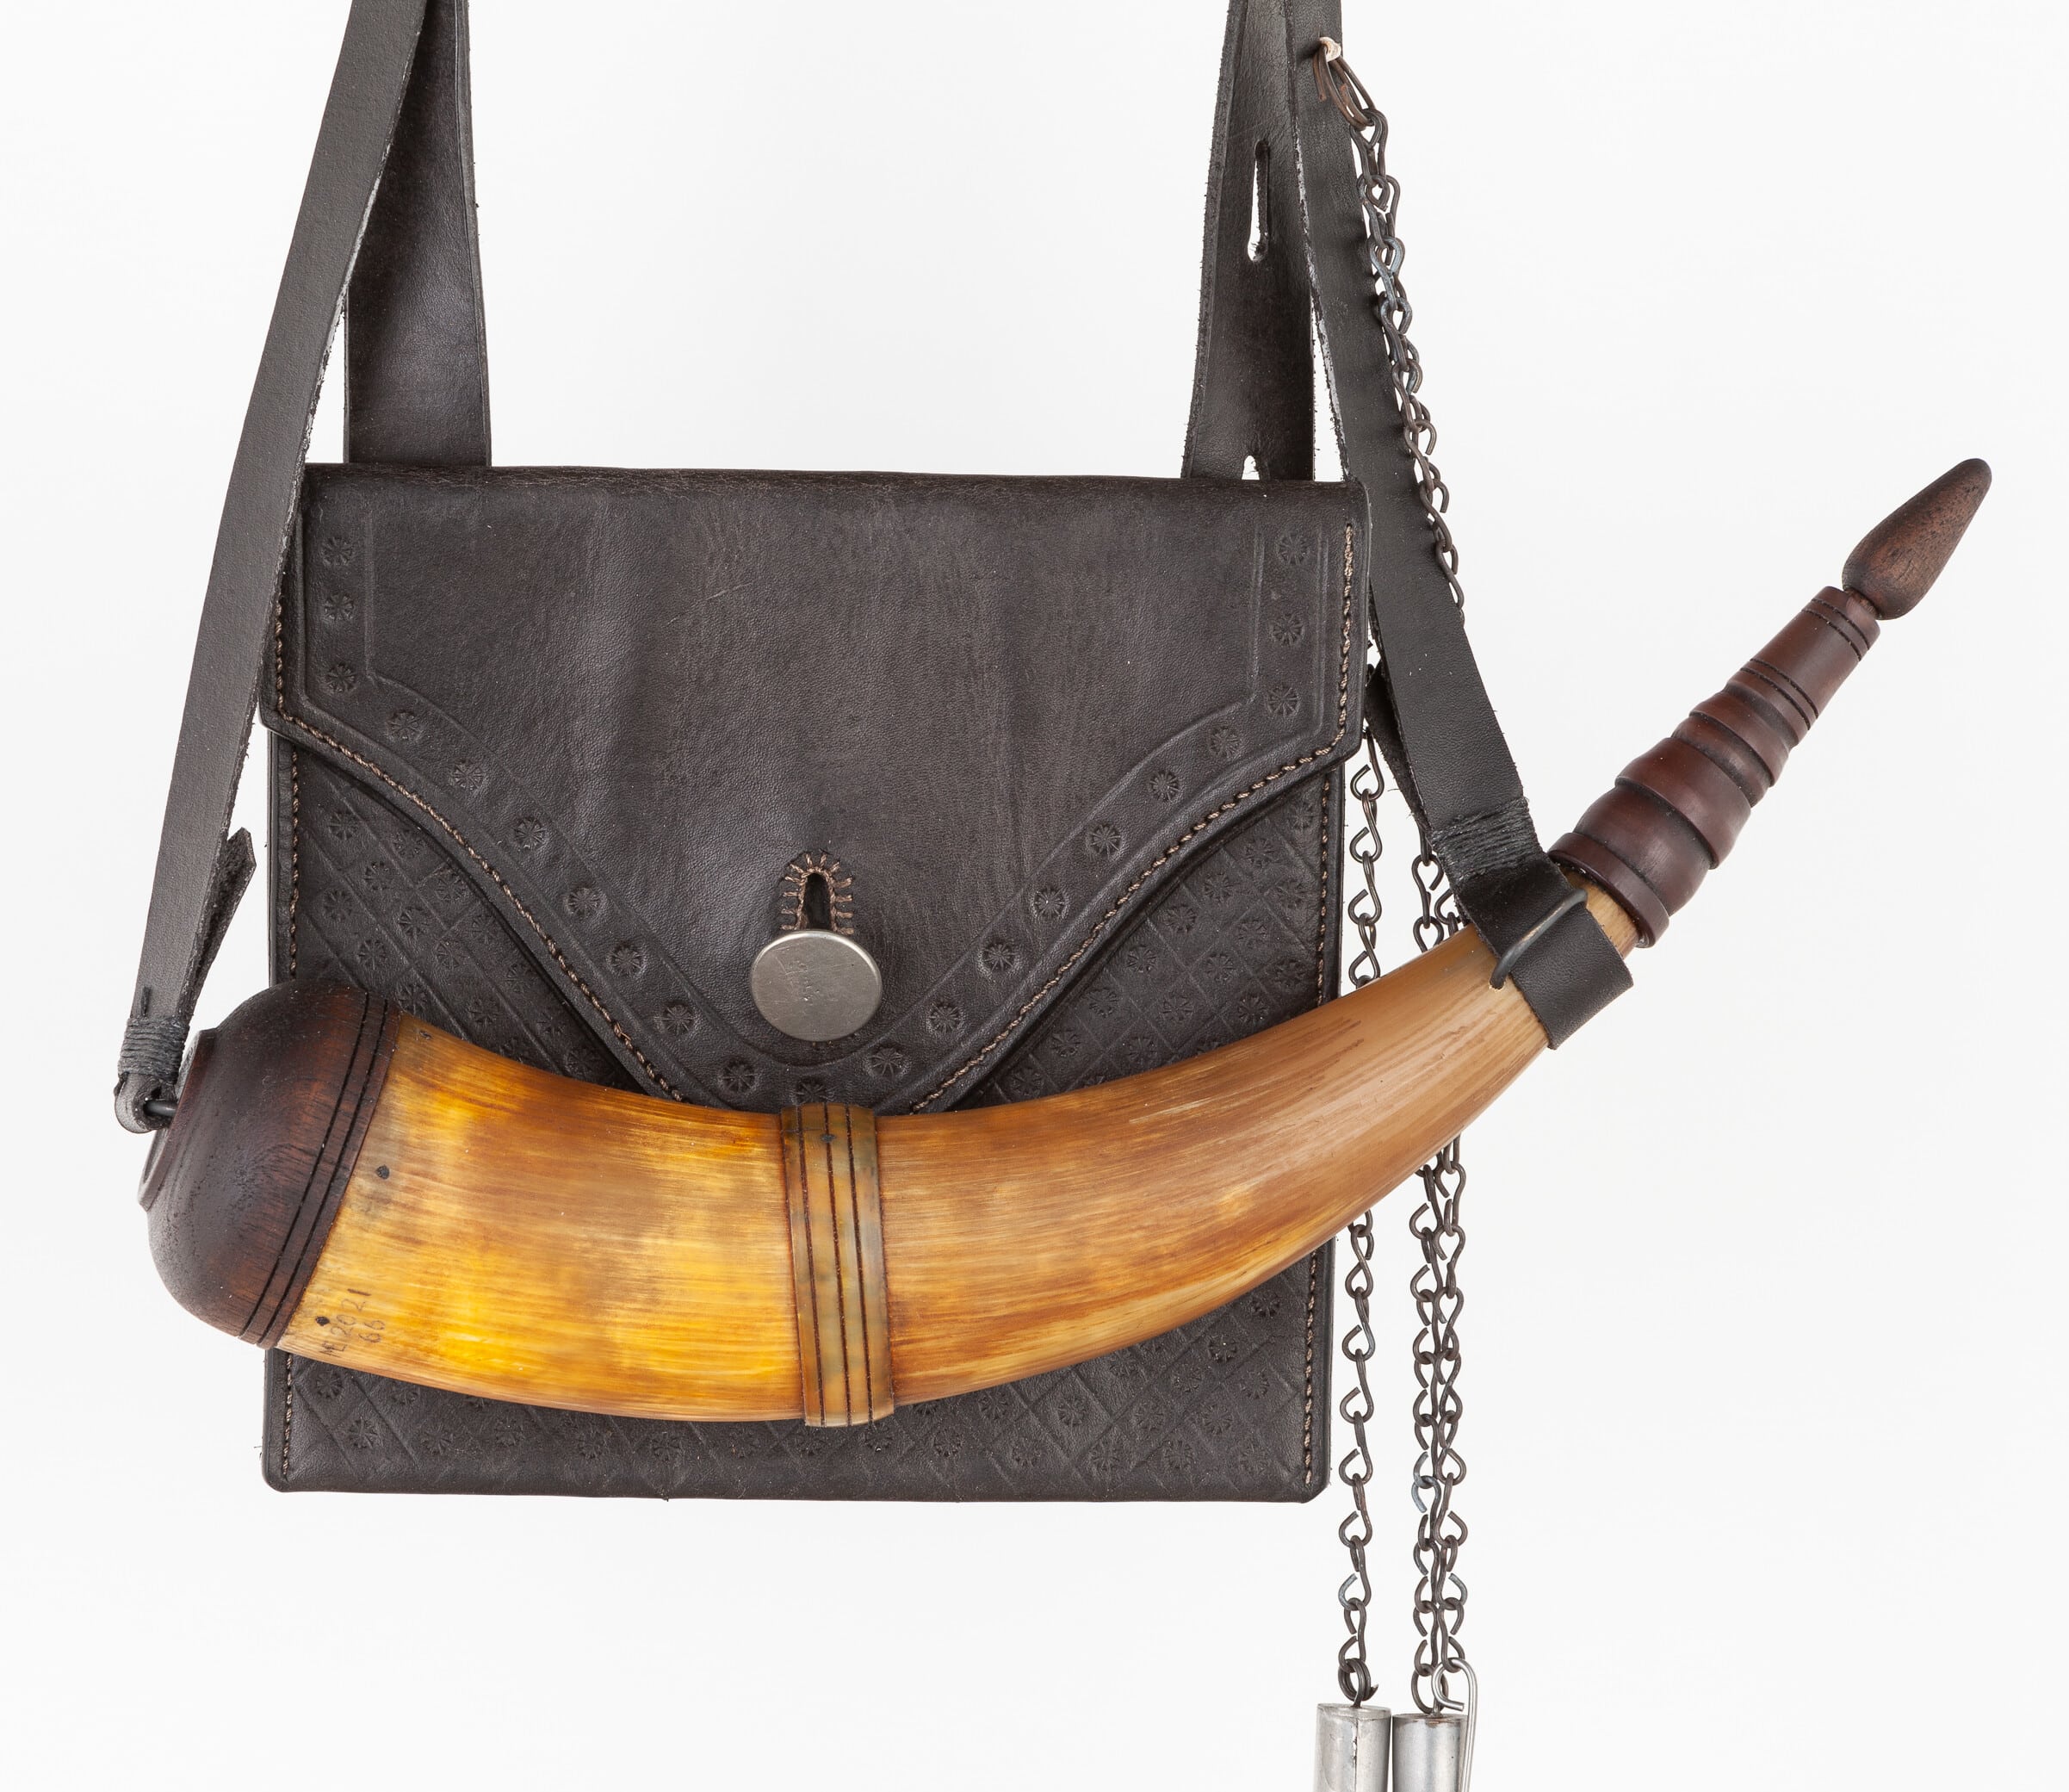
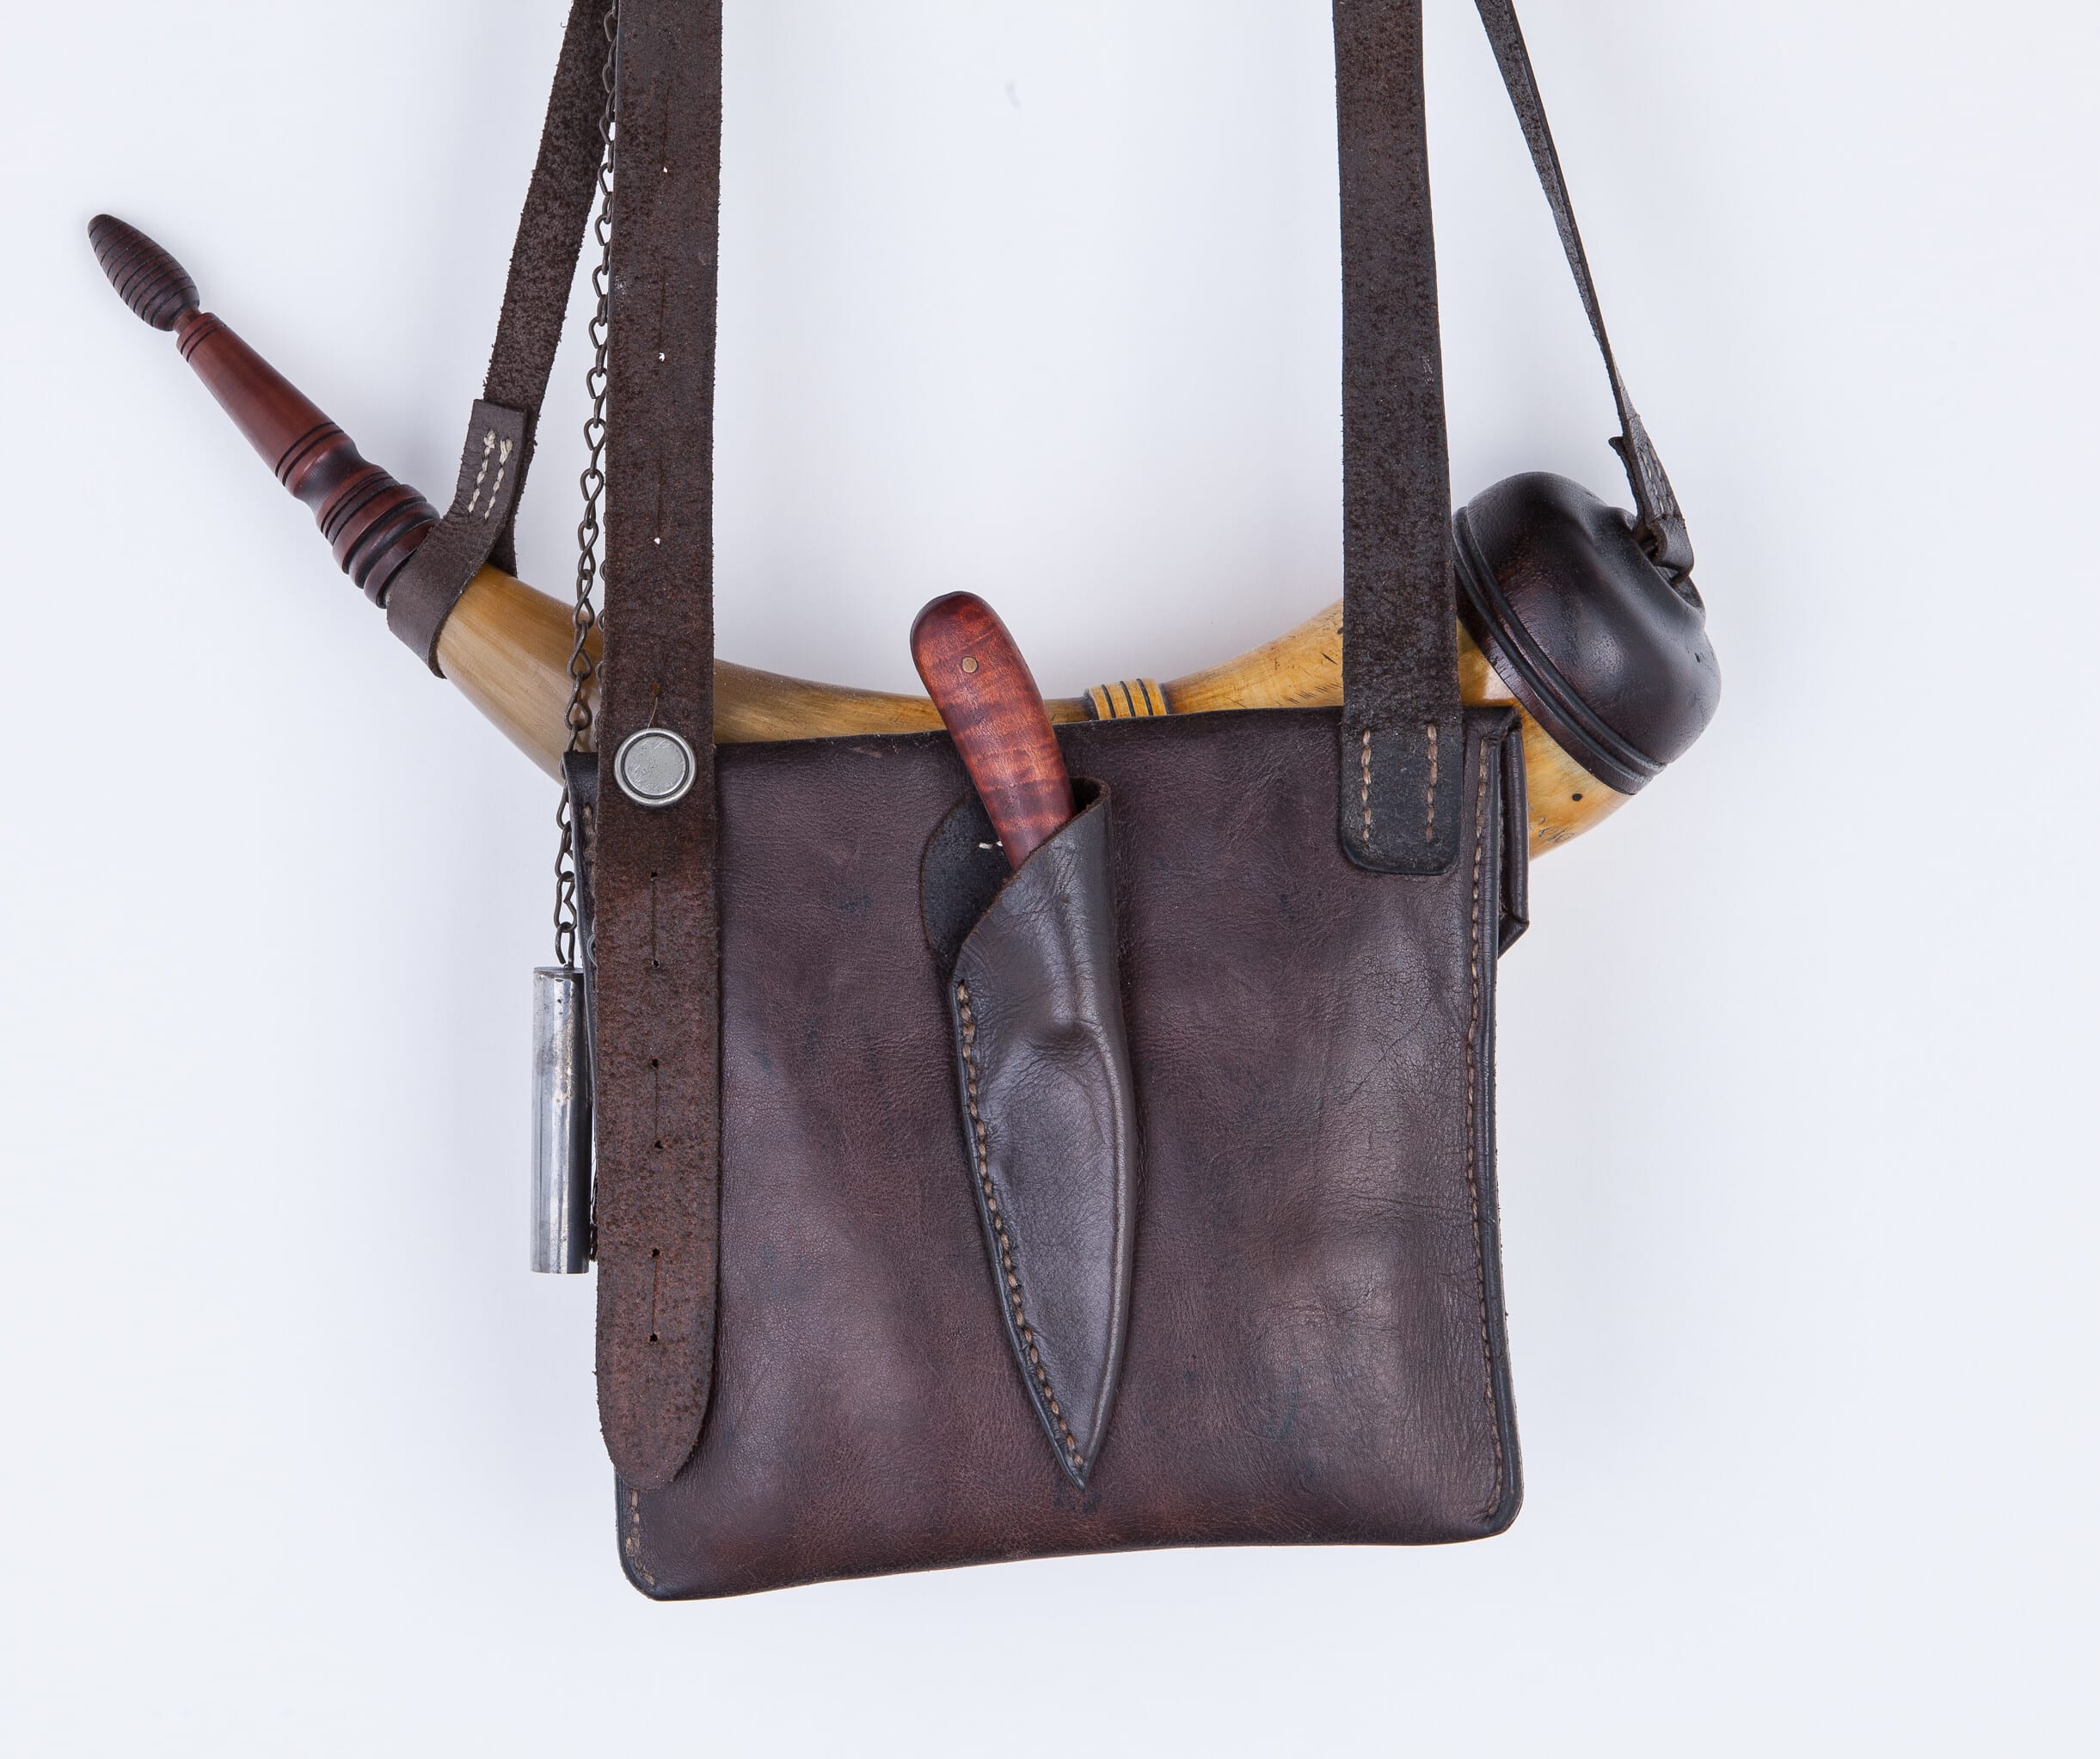 Not having Russia leather (a thin, textured, red dyed leather commercially available in the 18th century for upholstery work) which was most likely used to create the original, I created my copy of the original using 3-4 oz (may use 2-3 oz for some parts and 6oz for the strap) vegetable tanned cowhide which I stained using aqua fortis to give a dark brown color. I normally use vinegar and iron as a stain on my bags which usually gives more of a blue-black color. This bag is approximately the same size as the original at about 7″ square. Just like the original, this pouch has a center divider as the welt and is stitched up the sides. In Bag #10, I rolled and hemmed the edge of the flap instead of using a welted edge. I now make these bags using a welted flap just like the original. I maintained the same flap button attachment as the original with an internal horn button used as an anchor for the external pewter flap button. A leather cover is sewn over the internal button to prevent the hand from catching on it.
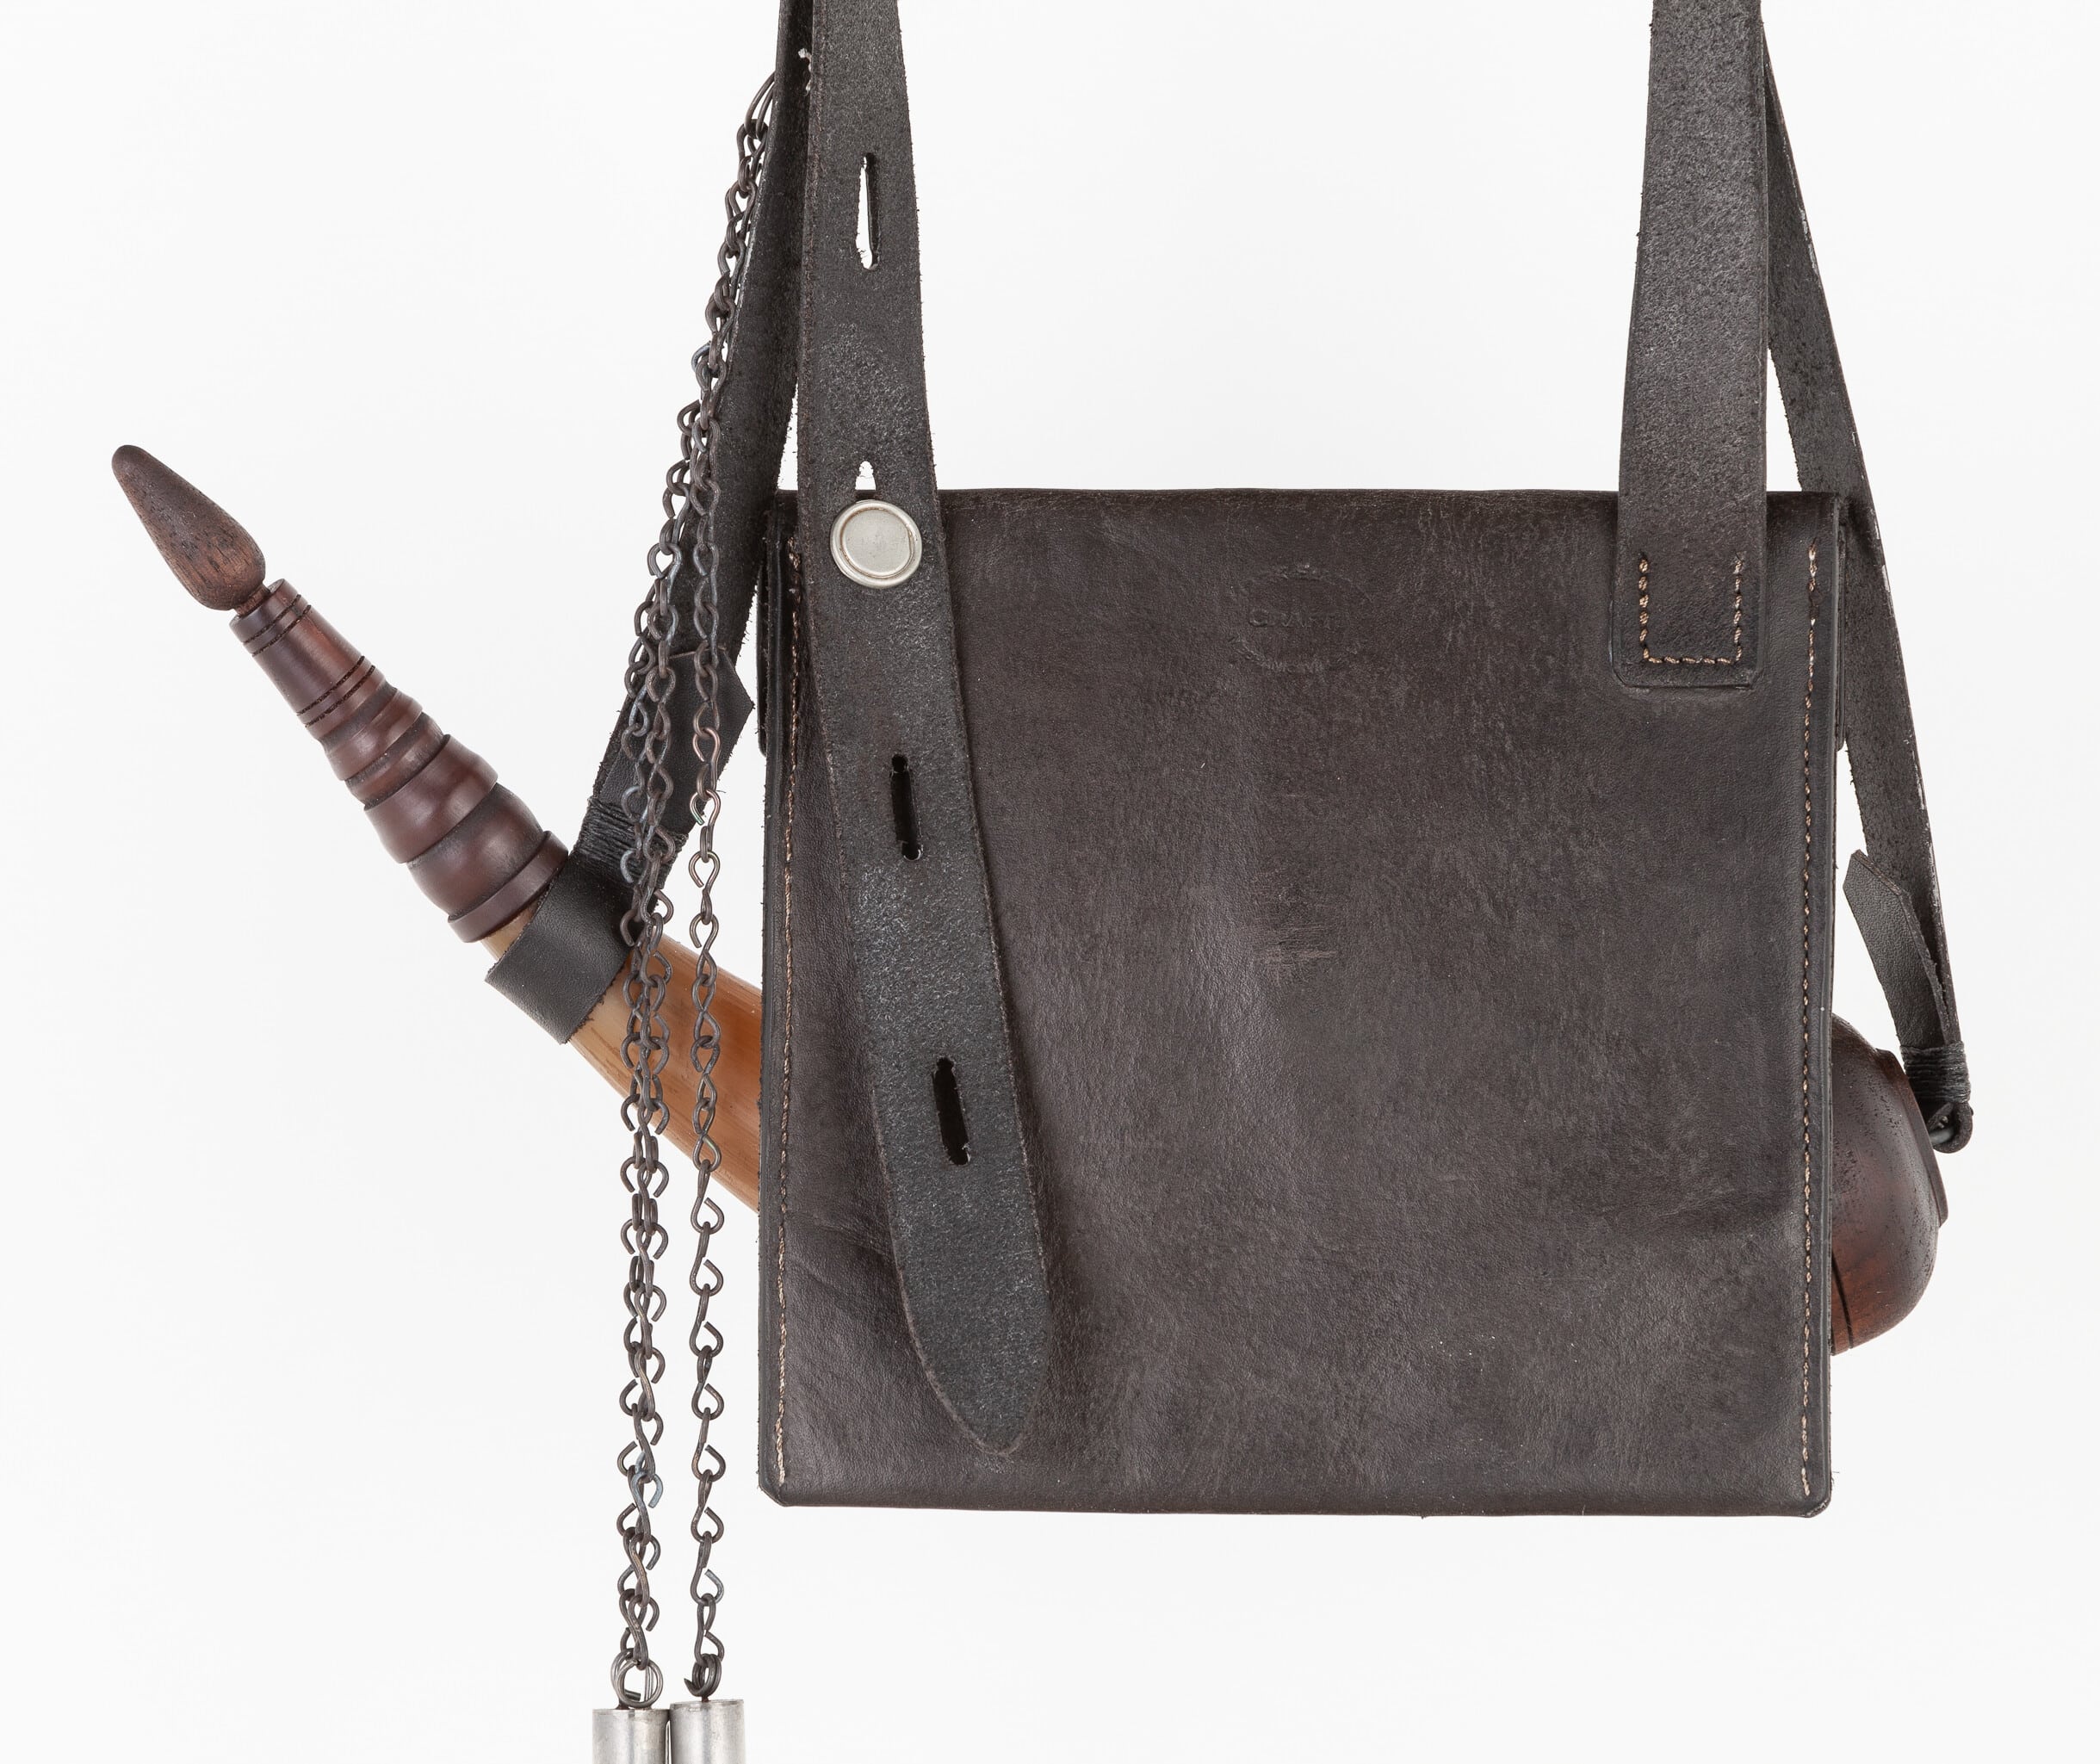
As for the strap, I attached it in a manner as close to the original as I could ascertain. One end of the strap is stitched to the right side (as worn on the right side), and the other end is attached to
the bag using a single small pewter button anchored to another small pewter button on the inside of the pouch. The strap may then be seasonally adjusted using buttonholes in the end of the strap. I usually only cut one set (strap and powder horn hangers) of button holes for the requested strap length, but more holes can be cut as required to adjust the strap.
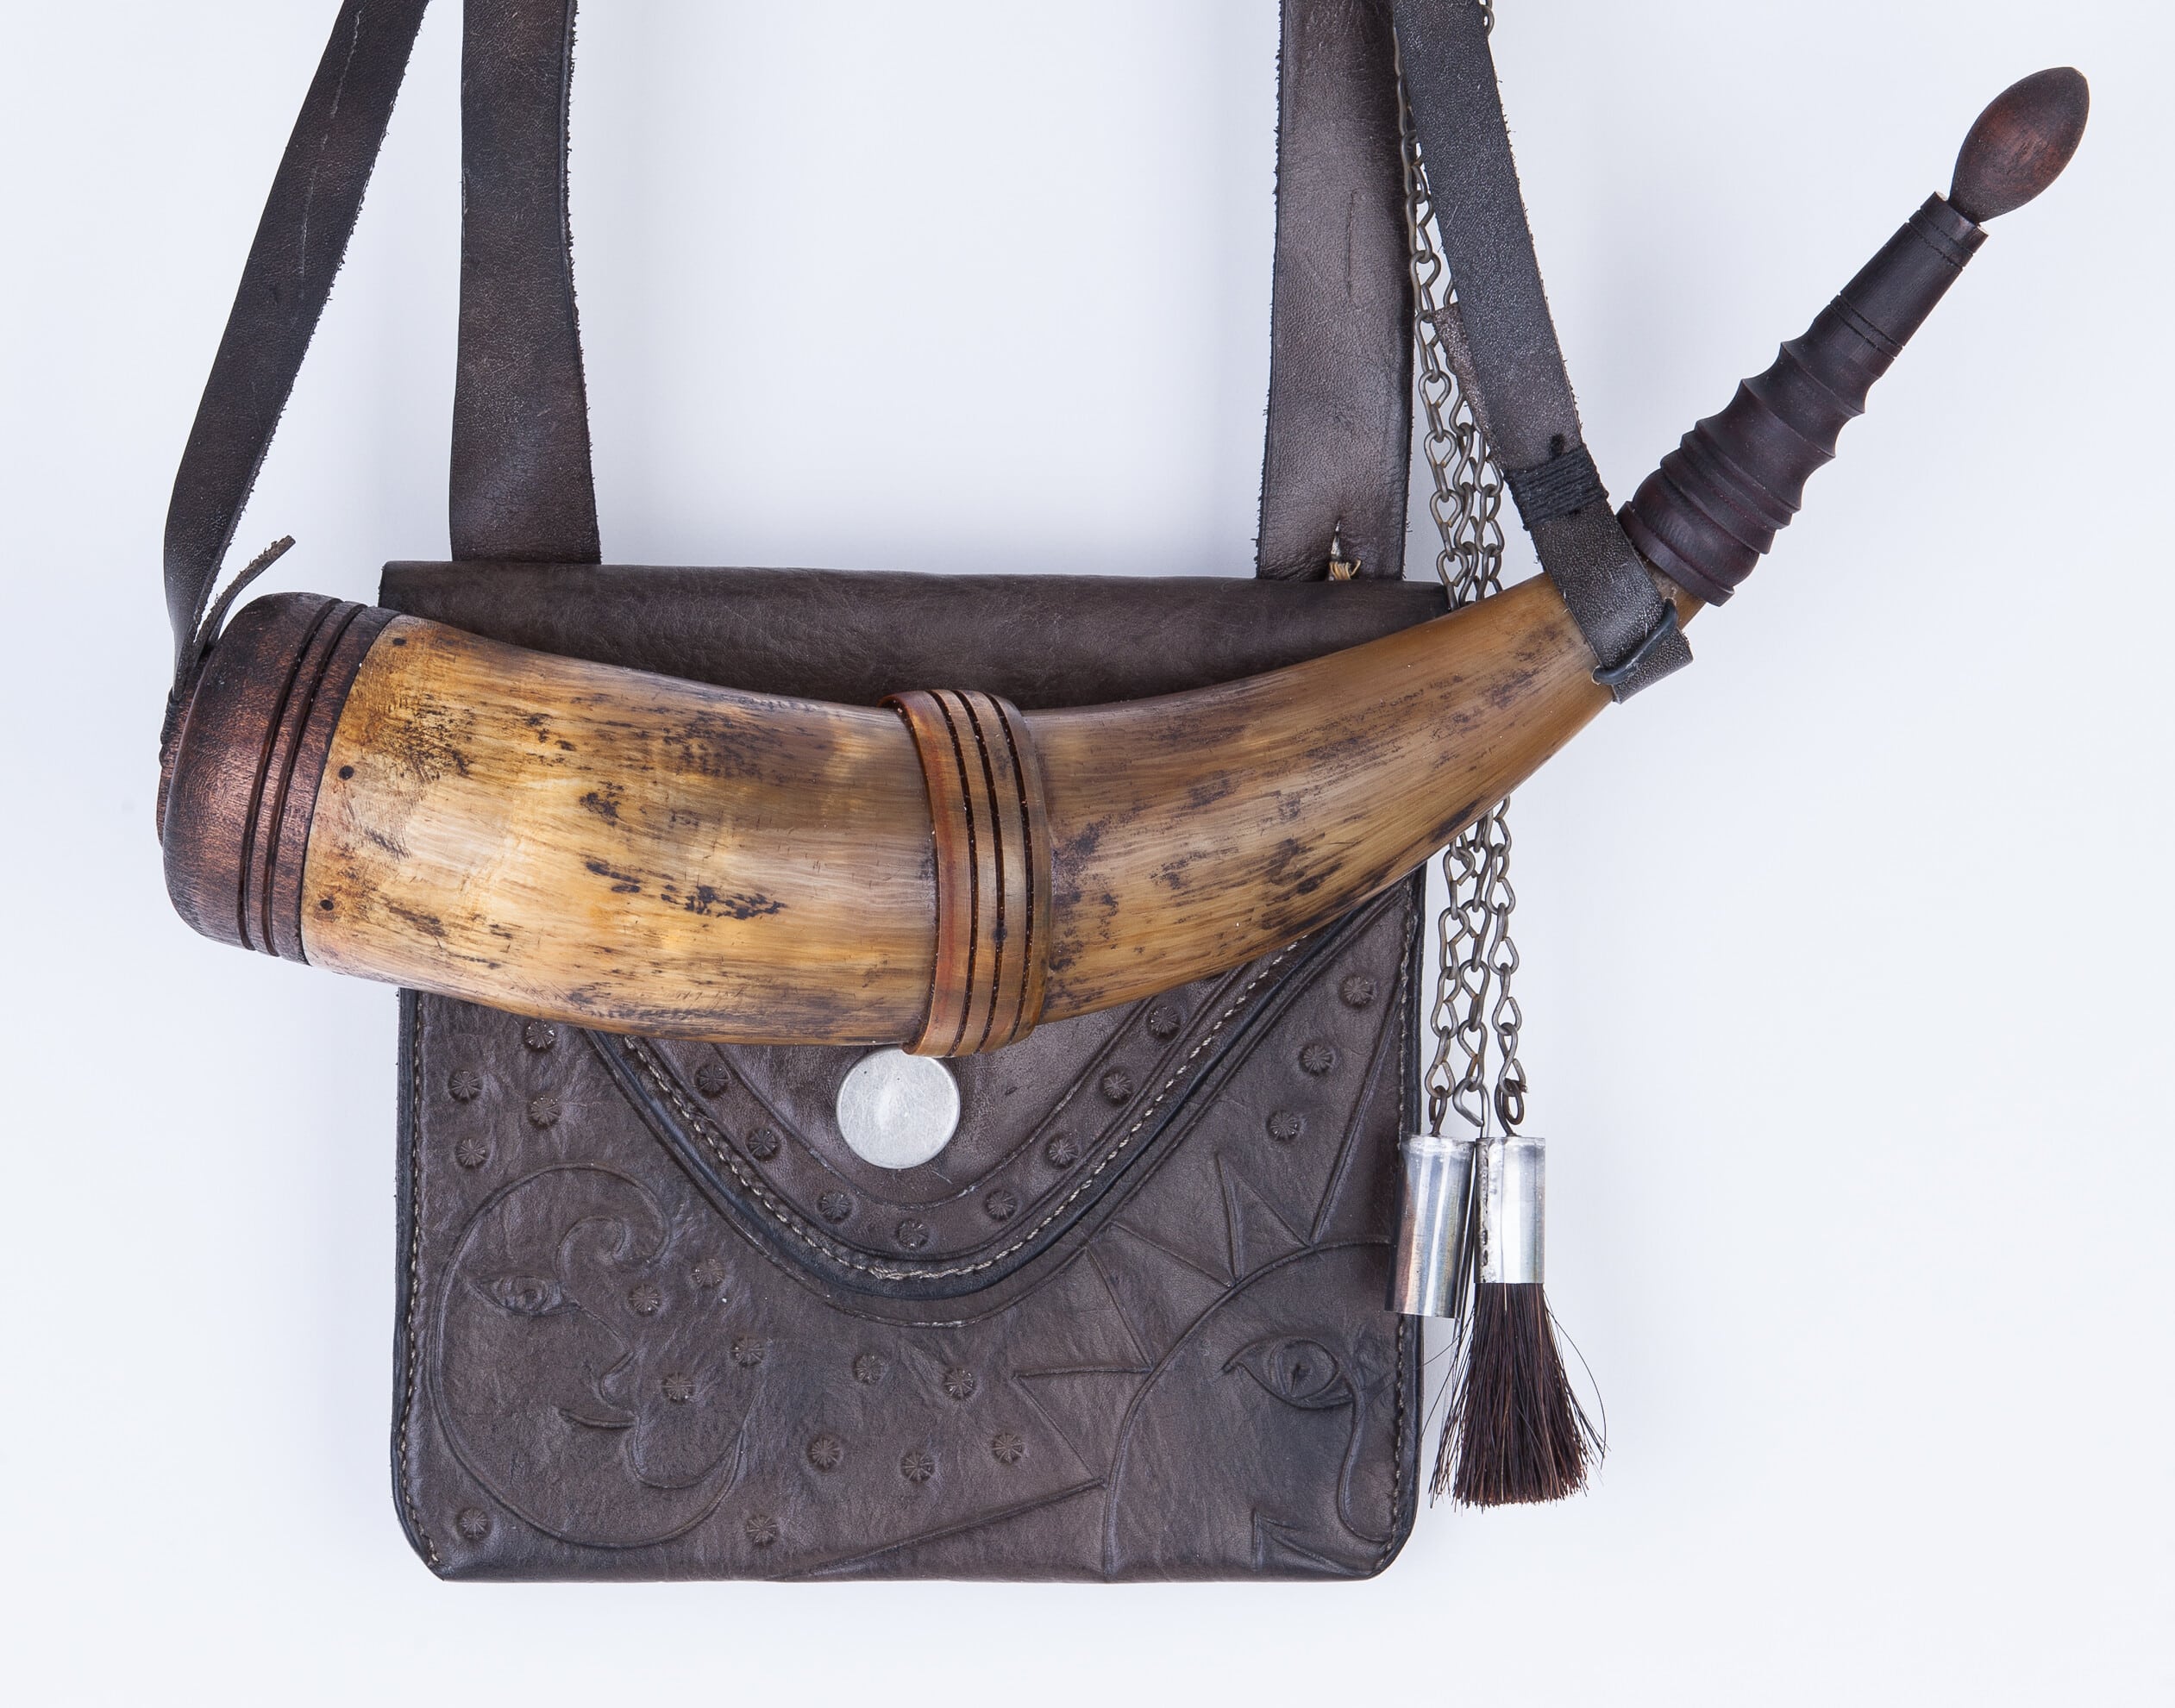
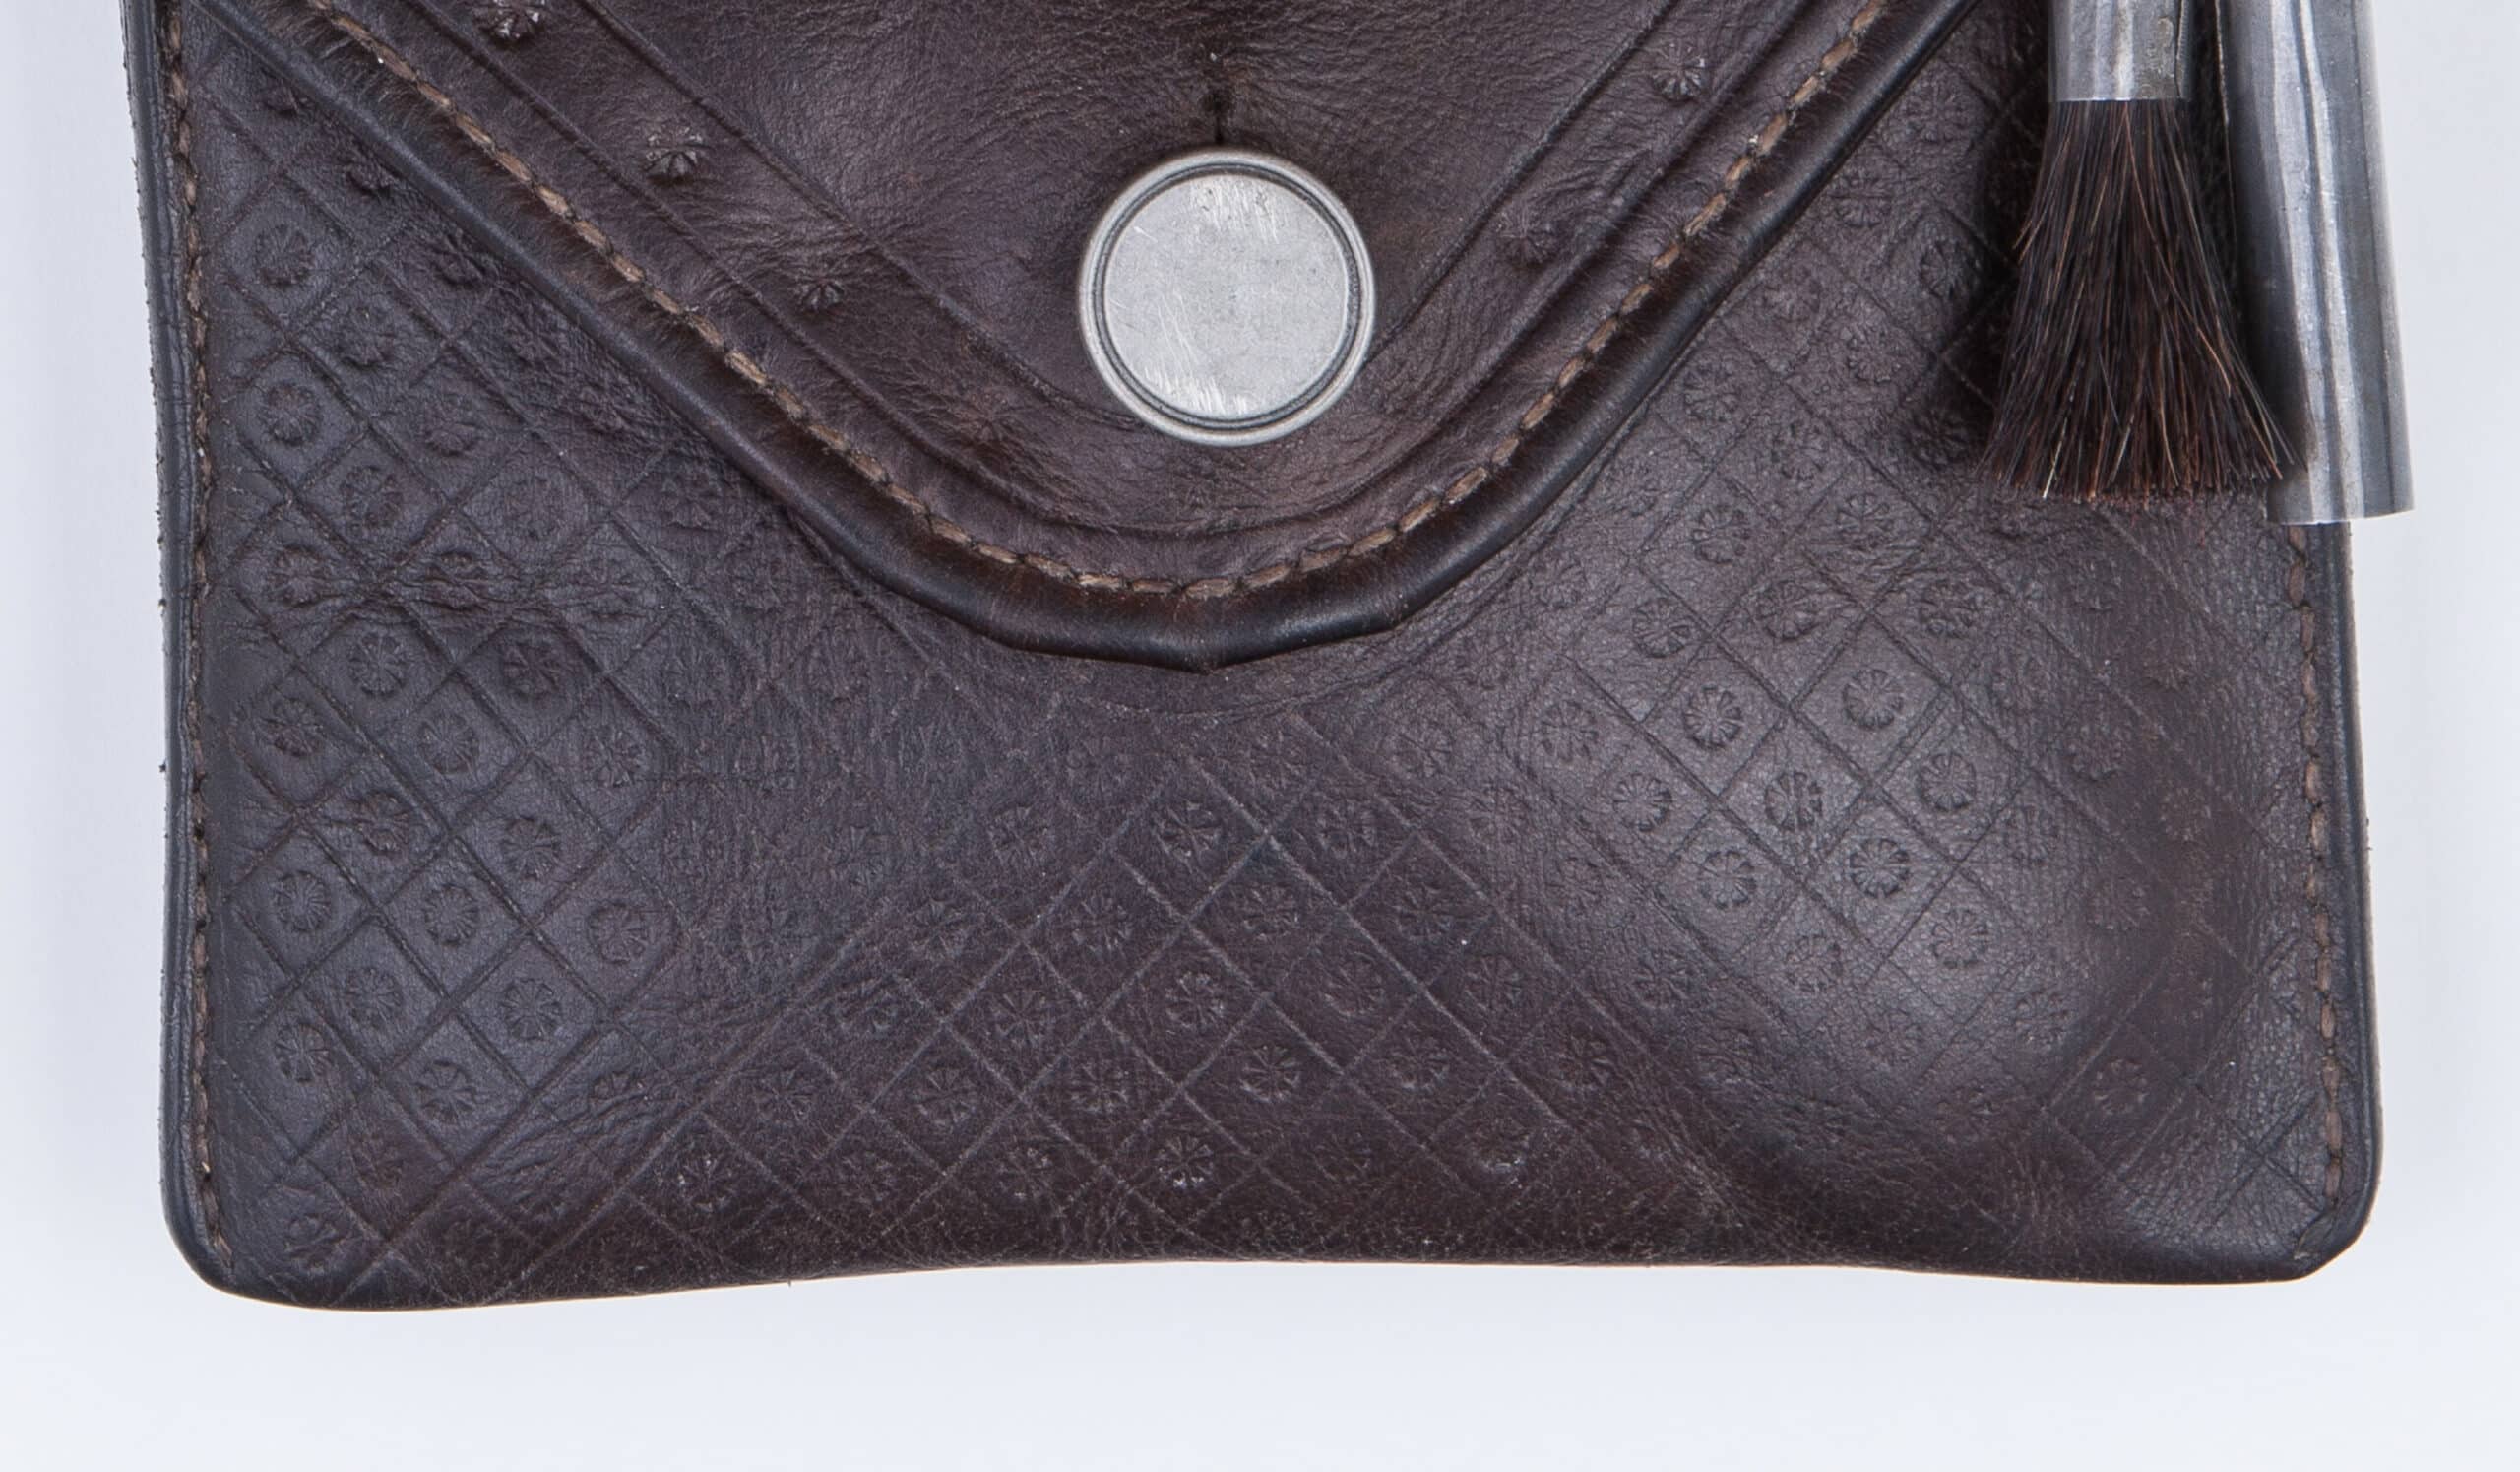 The original pouch was decorated with stamped stars, some forming the initials of the owner. Consequently, I made a matching stamp to decorate my pouch. However, I decided to get a little fancier with a more refined design. I added diagonal lines reminiscent of English checkering patterns. On the bags shown below, I used the same stamp to create the owners initials and to do a Sun, Moon, and stars motif. In fact, I liked the Sun, Moon, and stars design so much, I used it on two bags, one of them is shown below.
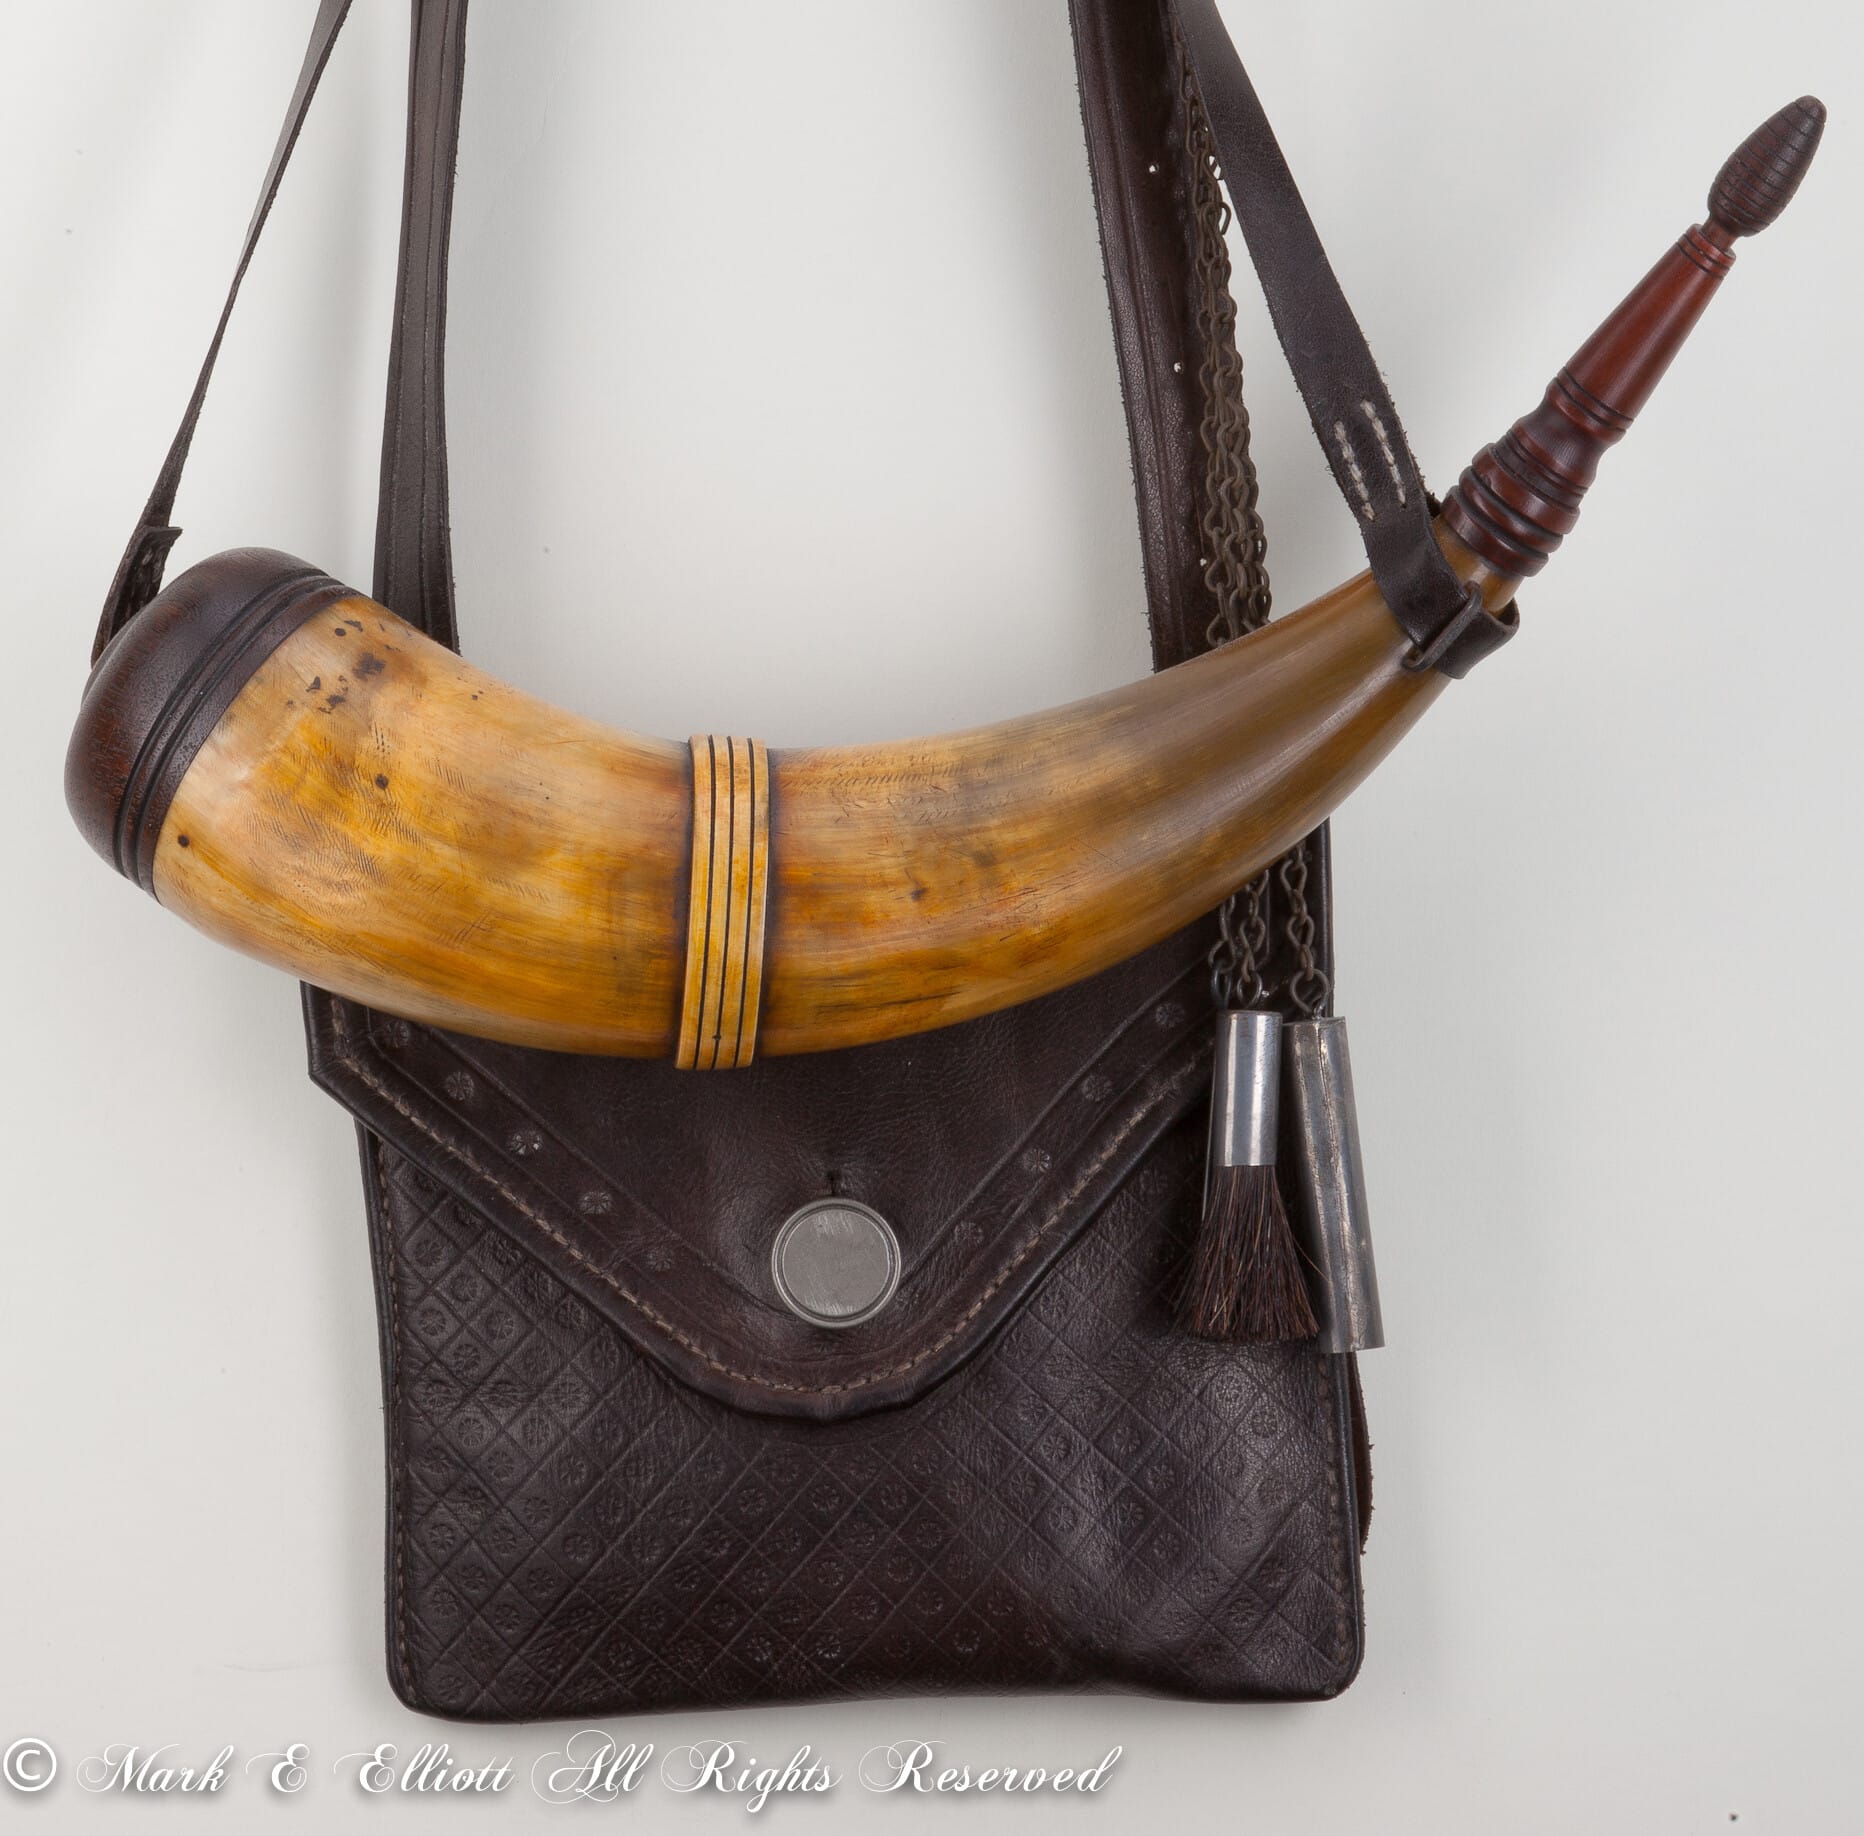 I attached to the bag a Virginia single banded screw-tip horn that is similar to an original dated 1774. The horn is approximately 15″ around the outside curve with a 2 3/4″ base plug. The base plug and stopper are turned walnut with the base plug attached with wooden pegs. The screw-tip and band are horn. The screw-tip is dyed to match the walnut. Hand forged staples are installed in the the base plug and throat for the attachment of the hangers. The hangers are attached to the bag strap with buttons just as the strap is attached to the bag. This attachment method is purely conjecture on my part, but I think it makes sense to be able to adjust the hanger attachment location as the strap length is adjusted. The horn is dyed yellow with aqua fortis and appropriately aged.
I distress the leather on most of my pouches to give them a used appearance. That means adding wrinkles, scuffs and scratches as well as a coat of black shoe polish to simulate a little dirt and grime. I try not to overdue it so that the function of the bag is compromised. I don’t generally distress the leather to be used on a bag that is to be highly tooled.
You might think that this bag is too small at about 7″ square. I can assure you that it is not. Period documentation indicates that most longhunters carried hunting pouches of this size. They would just carry what they needed to shoot the gun. This generally meant a bullet mold, some bullets, patches, tow, and a wiper. A powder horn and powder measure with a vent pick and brush were generally hung from the strap.
In my bag, I keep some tow, a strip of pre-lubricated pillow ticking for shooting patches, five balls, two flints wrapped in leather, and a turn screw of a type typically used with muskets. A turn screw would not have normally been found in an original hunting pouch as a longhunter would most likely have used their knife to turn the screws on their gun. However, being a gunsmith, I just can’t bring myself to risk tearing up my screw heads like that. All that said, this bag is plenty big for the listed items. I hang a pan brush, vent pick, and powder measure from either the pouch strap or powder horn hanger. I made those from recycled tin plated steel from a cookie tin. I have attached small knife to the back of the pouch to use as a patch knife. The period longhunters would most likely have just carried a store bought butcher knife in their belt. This is certainly all you need for a day of hunting and more than you need to carry to the line when shooting at the range.
Shown below are four more pouch and horn outfits very similar to the bag shown above. They are of the same basic design with different tooling. The bottom two outfits have a different type of early Virginia horn. Horn #21 was made to the client’s specification and is not based on a particular original. They all have a welted flap just like the original, and I am currently making all these style bags that way.
Please note that I no longer hang the powder horn as high as shown on most of the bags shown on this page. I have found that the outfit works better if you hang the horn below the flap button as in Bag #20/Horn #20 so that you can open the flap without moving the horn out of the way. I will, of course, hang the horn where you want with the hangers as long (or short) as you want. I have made the hangers all lengths but tend to think about 8″ is long enough. You can just tip the horn up to pour the powder.
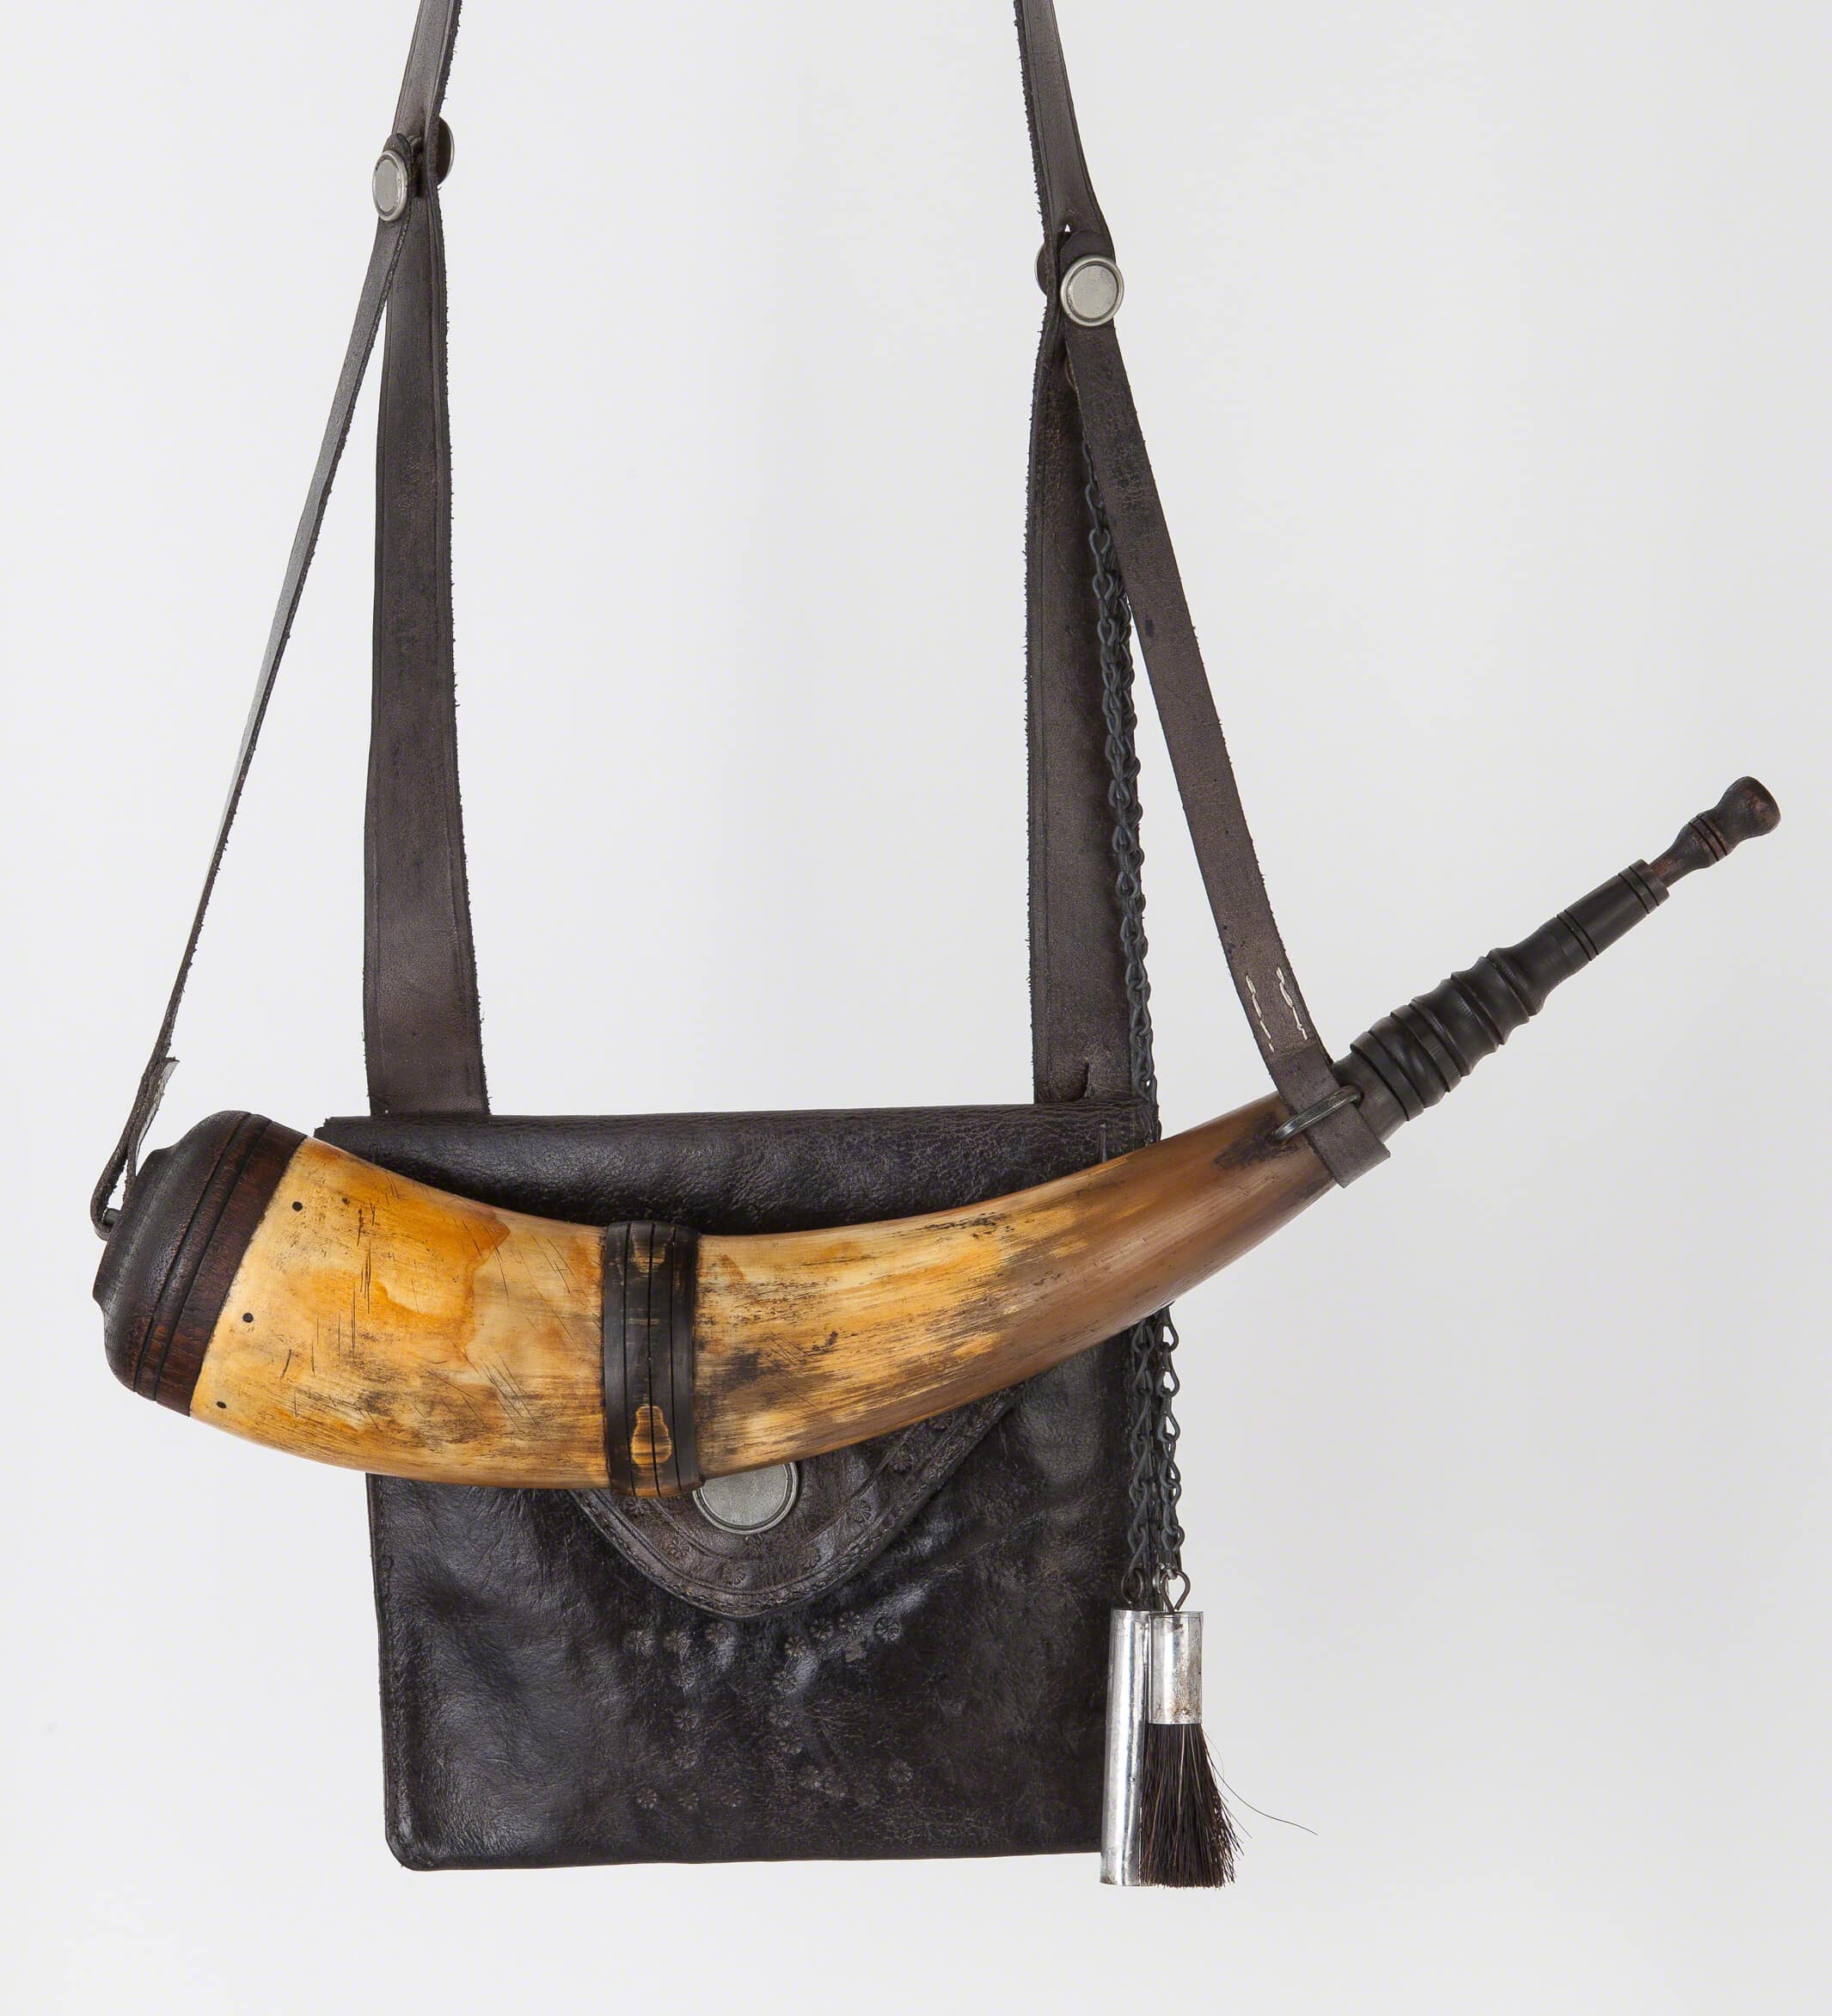
Below is an outfit available for sale that is very similar to the original Bag #10 and Horn #6. It consists of Bag #55 and Horn #66. The shot pouch has been tooled on the flap with stars and on the front below the flap with diamonds and stars. The single banded, screw-tip horn is about 14″ around the outside curve (not including the stopper), 11 3/4″ tip to tip, with a 2 7/16″ diameter black walnut base plug. The base plug was hollowed out about half its length. This is a fairly light horn that will accommodate a good amount of powder. The strap is about 53″ top of bag to top of bag with around 4″ of adjustment either way. The strap can be shortened. A tin measure set has been attached to the bag with about a 100gr powder capacity. It can be calibrated to the customers requirements prior to shipment.

Beautiful work. The leather is obviously dyed before sewing, correct?
The bag isn’t dyed. It is stained with Aqua Fortis (ferric nitrate). It reacts with the tannic acid turning it dark brown to blue black. I do the staining after construction, although I do wash the leather before sewing, and after staining.
Thank you for replying. In your article above it says you stained it with vinegar and iron. I’m familiar with those ingredients being left in a jar to make a stain for leather. Does that combination make “ferric nitrate”, or are you referring to the gun stock stain of the same name?. How do you apply the stain after its been constructed and managed to get every part of the bag stained?
I forgot that I wrote that. Actually, I don’t really remember what I used to stain bag #10. I used Aqua Fortis (ferric nitrate) on my early bags. I do know that everything after #10 was stained with vinegar and iron. The other bags shown were stained with vinegar and iron for sure. Aqua Fortis is the stain usually used on maple gun stocks. Vinegar and iron is a similar chemical; ferric acetate. In both cases, you are dissolving iron into an acid. Vinegar is just a milder acid than the nitric acid you use for Aqua Fortis. Accordingly, it takes much less time for the iron to dissolve in the nitric acid. However vinegar has always been and still is much more available and also safer. To make vinegar and iron (ferric acetate), fill a quart jar with vinegar and add some small pieces of rusty iron. Put the top on loosely and put the jar on a shelf. It will take several months for the vinegar to dissolve all the iron that it can take into solution. To use it, you just apply it to the leather. It will fairly quickly turn anywhere from dark brown to blue black depending on how much tannic acid is in the leather. Of course, this will only work with vegetable tanned leather. Usually, vinegar and iron produces a blue black color.
As to applying either the Aqua Fortis or vinegar and iron, I just use lambs wool and apply the solution liberally to all the exposed surfaces of the bag. I put extra on the seams. It just soaks in, many times it will soak through turning brown or black all the leather it touches. Usually it takes two coats to get the darkness I want. You can’t really control the uniformity of the color as that is dependent on the leather itself much as wood absorbs stain in a non-uniform manner. I really don’t do anything different with the stains than I do with standard leather dyes. I have been doing leather work for the better part of 40 years and usually, I do dye after the assembly. It is all going to wash through anyway when you rinse out the excess dye. The big difference between dye and the chemical stains is the that stains require much less solution than the dye. With the stain, I use a few ounces to stain a bag. With standard oil based leather dye, it takes the better part of a quart to dye the entire bag and most of that is rinsed down the drain. That brings up another issue, you never get all the excess oil dye rinsed out. With the chemical stains, you are only rinsing out the excess stain, not the color of the leather. The color change in the leather from the chemical stain is caused by a chemical reaction in the leather, not by the addition of pigments. You will never rinse out the color from a bag stained with AQ or vinegar and iron, and you won’t end up with the color on your clothes in the rain. Remember, these items are used outside in all types of weather.
I should note that I do stain or dye before assembly if I am using a lining or something I want to be a different color from the body of the bag. However, that is a very small percentage of the bags I make. For the most part, I am trying to recreate historically correct bags, horns, and guns. I have never seen an old shot pouch that was lined. That doesn’t mean none were lined, just that most weren’t. Most, old, handmade things were pretty plain. With out modern mindset, and I am also guilty of this, we like to embellish and finish to a higher degree than our ancestors would have considered necessary 200 years or more ago. Remember that as recently as 150 years ago, settlers on the plains were living in what were basically mud huts. When you are that poor, your expectations are not very high.
Thanks Mark,
Most excellent article. Thanks for all the detail. As a maker of accoutrements, bags in particular, I really appreciate all the information. And I agree, simple, and functional is best.
Great research and beautiful work, thanks for sharing your knowledge and experience.
Chris Crosby
You do very nice work. Thanks for sharing so much of your techniques and methods. You certainly give the aspiring leather worker something to strive for.
Take care.